Photobucket

Friday, September 13, 2013

8 Pumpkin Recipes for Fall

It doesn't take much for me to get a pumpkin craving. Just the mention of fall gets me in the mood to eat a pumpkin pie. Or ten. I know a lot of people who can't wait to put up the Christmas decorations but for me, I can't wait for fall so I can bust out my boots and make some fall desserts.

For this week's round up, I decided to include 8 tasty recipes that include my favorite fall ingredient, pumpkin!

Pumpkin Bread Pudding with Caramel-Pecan Sauce via Confessions of a Cookbook Queen

Pumpkin Spice Breakfast Smoothie via A Beautiful Mess

Pumpkin Pie Dip via Shugary Sweets

And how could we forget our furry friends? Try these Pumpkin Dog Biscuits via Simmer Till Done

Pumpkin Pie Lasagna via Beyond Frosting

Pumpkin Pie Nog via Better Homes and Gardens

Pumpkin Pie Truffles via Six Sisters' Stuff

Pumpkin Pie Ice Cream via Your Homebased Mom


Check out our Link Party Page to see where we link up each week!
photobucket

Thursday, September 12, 2013

Fall Collection 2013!

We have some exciting news...

Today, Jess of The Sewing Rabbit announced the release of her fall line....and we got to contribute a piece of clothing to it! A palette was chosen, and all the contributing bloggers at The Sewing Rabbit made an item of clothing for fall.

Can you guess which one is mine??

Even better, we'll be sharing tutorials (and some free patterns!) for the things we've made! You can head over to The Sewing Rabbit to learn more about the fall collection release, as well as how to share your fall sewing creations to be featured!

Wednesday, September 11, 2013

The Best Grilled Cheese Ever + Homemade Pesto


Obviously, you are all fully aware that I am a vegetarian and pretty much the only reason I don't call myself vegan is because of my undying love for cheese.  I love cheese so much that on my shirt for the Pittsburgh Marathon 5K this year I considered writing "I Run for Cheese" instead of some noble cause like most others.  I believe in honesty, people.  (I ended up leaving the "I run for ___" empty).  Anyway, this grilled cheese is going to rock your world. It's unreal.

Grilled Cheese Ingredients:
Fontina cheese
Whole grain bread
butter (or whatever you prefer to use to help toast the bread)
Tomato
Pesto

Pesto Ingredients:
One large package of basil
1/3 cup extra virgin olive oil
1/8 cup pine nuts
1 clove garlic
Himalayan Pink Salt
Fresh cracked black pepper
1/4 cup freshly grated parmesan cheese


Let's start with the pesto first:

1 - Put your basil, pine nuts and garlic in your food processor and pulse until all chopped up.

2 - Add the oil, then salt & pepper to taste. Pulse until smooth.

3 - Add in cheese and mix until incorporated. 

Now onto the Grilled Cheese!


1 - Keep your stove top on medium heat.  Melt better in frying pan.
 2 - Place slice of bread in pan with cheese on top.  Cover with a lid to trap the heat in so the cheese will melt.
3 - Once the cheese has started melting, place the tomato on the cheese. 
4 - Spread pesto on second slice of bread, then place on top of tomato. 
5 - Flip sandwich and cover again until bread is toasted.


Now dig in and enjoy! 


Check out our Link Party Page to see where we link up each week!
photobucket

Monday, September 9, 2013

Leather Belts to Wrap Bracelets


My husband's grandmother gave me a box full of belts a few months ago, and after picking out a few to use for crafts, I saved a few favorites for myself. The only problem is, Grandma must have been a size 0 when she wore them (which I certainly am not!) because they were tiiiiiiny! Most of them found their way into my craft room to be refashioned later, but I held onto this cute yellow skinny belt for myself, thinking I could make it work...that is until I tried to force said size 0 skinny belt onto my size 6 waist and it broke.

But when life hands you lemons and broken belts, you make jewelry!

So grab a few skinny belts from your closet (or from your local thrift store) and lets make some leather wrap bracelets.


SUPPLIES: leather belts (preferably skinny belts), scissors, leather punch or Crop-o-dile.


ONE: wrap your belt around your wrist until you're happy with the bracelet size, leaving some extra for the tail.
TWO: cut that bad boy.
THREE: use your leather punch or Crop-o-dile to punch holes in your bracelet to make it adjustable.


Now make a bunch! I bet you could find a ton of fun prints and colors at a thrift store. I'm hoping to find some neon or metallic belts to make into bracelets next.


Enjoy your new jewelry!


Check out our Link Party Page to see where we link up each week!
photobucket

Wednesday, September 4, 2013

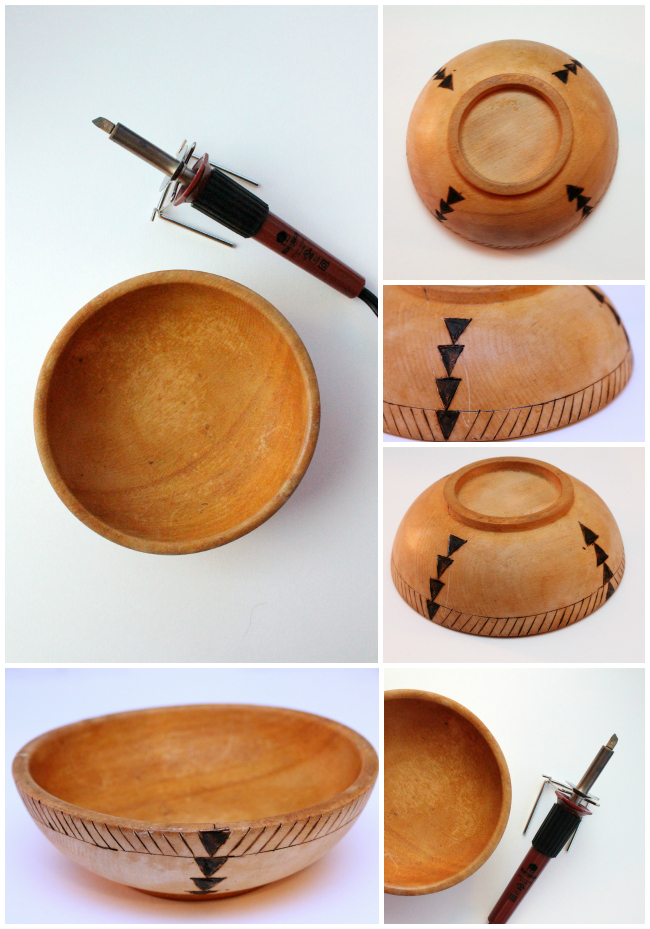
DIY Beeswax Candle & Wood Burned Bowl


Hey all!  This is a project I shared over at Whipperberry in July.  This is by far one of my most favorite projects I've done!

Now, let's make a scented beeswax candle.For the container, I'm using a wooden salad bowl that I bought at an estate sale for 25 cents.  

What you will need:
A wooden bowl
Wood burner
Block of beeswax (got mine at Hobby Lobby)
Wooden wick (Hobby Lobby)
Pasta Pot
Pyrex 4 cup measuring cup (or something similar)

Start by customizing your bowl by burning a design into it.  If you don't have a wood burner, you could always paint a design.

Next is the hardest part.  You need to guesstimate how much wax you will need to fill your bowl.  You want this to be in smaller chunks so it will melt properly. I just stabbed the block with a knife and plied chunks off of it.  

You need to use a double boiler to get the wax to melt without burning.  I kept my stove set on medium.  I found that if I turned it up higher than that the boiling water would jump into the wax (which, like I discovered, causes issues in the drying process).  

Use a cooking thermometer to monitor the heat of the wax.  It should get up to about 160-165 degrees and never go over 185 degrees.  

Once the wax was completely melted, I used some perfume oil I had from The Body Shop to scent the wax.  Essential oils can be used as well.  (If you want a candle that will relax you, use Eucalyptus Essential Oil and burn it while you are taking a bath.. so relaxing!)

Now, pour the wax in your container!  You can place the wick in first or after it is poured. It doesn't really matter.  I had some wax leftover, so I used a vintage baking tin for the rest.

The drying part can be quite tricky.  If it dries too fast, you will have cracking (like you can see in the photos of mine below).  Upon doing some research, it is best to place the containers on a cookie cooling stand so that the wax can dry from the bottom up.  This will also help prevent cracking.

Once my wax was completely cooled and hardened, I saw some separation from the side of the bowl and discovered all the water that had jumped into the melting wax had caused the wax to pull away from the container.  The water all dumped out, but it's definitely good to try and avoid this.

Fortunately, after burning for a little while, the crack will fill itself in, so no worries!


 I'm definitely over-the-moon pleased with how this turned out!  This was my first run at making candles and I think I'm hooked.  Would this not be an awesome house-warming gift, too?  


Check out our Link Party Page to see where we link up each week!
photobucket

Monday, September 2, 2013

Five and Ten Designs - Denim Jumper From Look #8


I'm sure you've been seeing all the gorgeous dresses popping up around the web from the Five and Ten Designs eBook. Five and Ten Designs is a brilliant collaboration of 5 indie designers who came together to make 10 different looks from one basic bodice. The concept is brilliant! There's so much you can do with a basic pattern, and I love how these talented ladies put their own creative spin on each design to come up with a gorgeous collection of 10 different dresses.

After looking through the eBook, "Look 8" by Delia of Delia Creates caught my eye immediately. All the adorable pleats won me over. And the cut out pockets? I couldn't help myself, I had to make one for Haley's fall wardrobe.


I did a little pattern tweaking to make the tunic into a jumper, perfect for fall layering. I simply chopped the shoulders of the front bodice off, lengthened the straps on the back bodice and added buttons. I love how it turned out, and so does Haley! She put it on right away and wouldn't let me take it off.

Since I wanted the jumper to be a little heavier for fall, I used some dark wash denim that I scored from an estate sale for the main fabric. The lining and pocket fabric is LouLouThi Summer Totem Tart by Anna Maria Horner.


Delia's instructions were very clear and easy to follow. For once in my life I didn't have to go back and pick out any stitches :) And while my daughter typically wears a 4T/5, I took a risk and made the jumper in a 6 so she could grow into it. I'm all about letting my kids grow into bigger clothing, especially with handmade clothes because I hate to see them worn for just one season. The jumper fits my little string bean great! It's definitely a bit baggy on her, but that just means I'll get another season out of it.


Haley's favorite feature? The pockets of course. Especially when they're filled with jellybeans ;)


Thanks to Jess of The Sewing Rabbit for letting me try out this fabulous eBook! 

If you haven't picked up your copy of Five and Ten Designs Volume 1 yet, go do it because it's on sale for 15% off through end of day today! Just use the coupon code LaborDay when you check out.
Related Posts Plugin for WordPress, Blogger...