Photobucket
Showing posts with label refashion. Show all posts

Wednesday, September 24, 2014

Fix Tight Pants by Adding a Tuxedo Stripe

This post was previously featured on The Sewing Rabbit, and I'm bringing it home today. Enjoy!


My sister-in-law recently gave my daughter a pair of the cutest strawberry printed skinny pants from Gymboree. The only problem was that they were squeezing the circulation out of my daughter's already tiny buns. I was able to get them on her, but it wasn't without lots of tugging and pulling and uncomfortable pressure on her belly. I couldn't bear to see the pants go without being worn, so I decided to utilize the tuxedo stripe trend and let the pants out by adding a stripe of material to either side side of the pants. It worked like a charm!

Trendy and useful? Check and check.


It's relatively easy to take in a pair of pants that are too big, but usually much more difficult  to let out a pair of pants that are too tight without going to a tailor. This method  got me the results I wanted while also following a trend at the same time. I call that a win in my book!

Let's get refashioning!

SUPPLIES: 1 pair of tight pants in need of adjusting, coordinating material to use for the stripe (use bottom weight fabric like twill, denim, corduroy, etc.), seam ripper, heavy duty or denim needle, sewing machine and basic sewing supplies.


Here is the pair of pants I started with. I didn't get a picture of my daughter in them beforehand, but let me tell you, they were tiiiiiiight!


I chose to go with denim that I had in my stash because it matched perfectly with my pants. There are a lot of great color choices in bottom weight fabrics out there though. You could also go with a contrasting fabric, but I didn't want to go too crazy since the pants already had a busy pattern to them.

Deconstructing Your Pants:

ONE: using your handy dandy seam ripper, carefully rip the stitches on each side of your pants from below the waistband to the bottom of the pant leg.


TWO: now, if your pants have an adjustable waistband like mine did, make sure to unbutton the elastic and push it back into the waistband away from the side seam so you don't cut it accidentally in the next step.


THREE: now I know this part can be a little scary but you're now going to cut your waistband on each side, being sure to avoid cutting the elastic from your adjustable waistband if you have one. Just make a straight cut following your side seam.
FOUR: open your pants up and wonder what you just did to your poor pants. Just kidding, stick with me! :)

Adding The Tuxedo Stripe:

ONE: measure the full length of your pants from right below your waistband to the bottom and add 1 inch for seam allowance. You'll also need to include the length of your waistband (you'll see why in the next few steps), so measure from the top to the bottom of your waistband and multiply x2 (to include the length of both the front and back.) Mine was 1 1/2 inches from top to bottom x 2, so 3 inches total. Add that to your other total length measurement.
TWO: decide how much total width you want to add to your pants depending on how tight they are and divide by 2, then add 1/2 inch for seam allowance. I decided to add a total of 3 inches to the pants, so each stripe would need to be 1 1/2 inches wide plus 1/2 inch, so 2 inches each. Cut 2 from the lengths and widths you determined above, making sure the stretch of the fabric, if there is any, is going sideways.
THREE: next, unpick your waistband by about 1 1/2 inches.
FOUR: open your waistband so it lays flat. Extend one of your tuxedo stripes 1/2 inch over the edge of the waistband and line the raw edge of one of your tuxedo stripes up with the raw edge of your pants, right sides (or pattern sides) together (see picture below.)
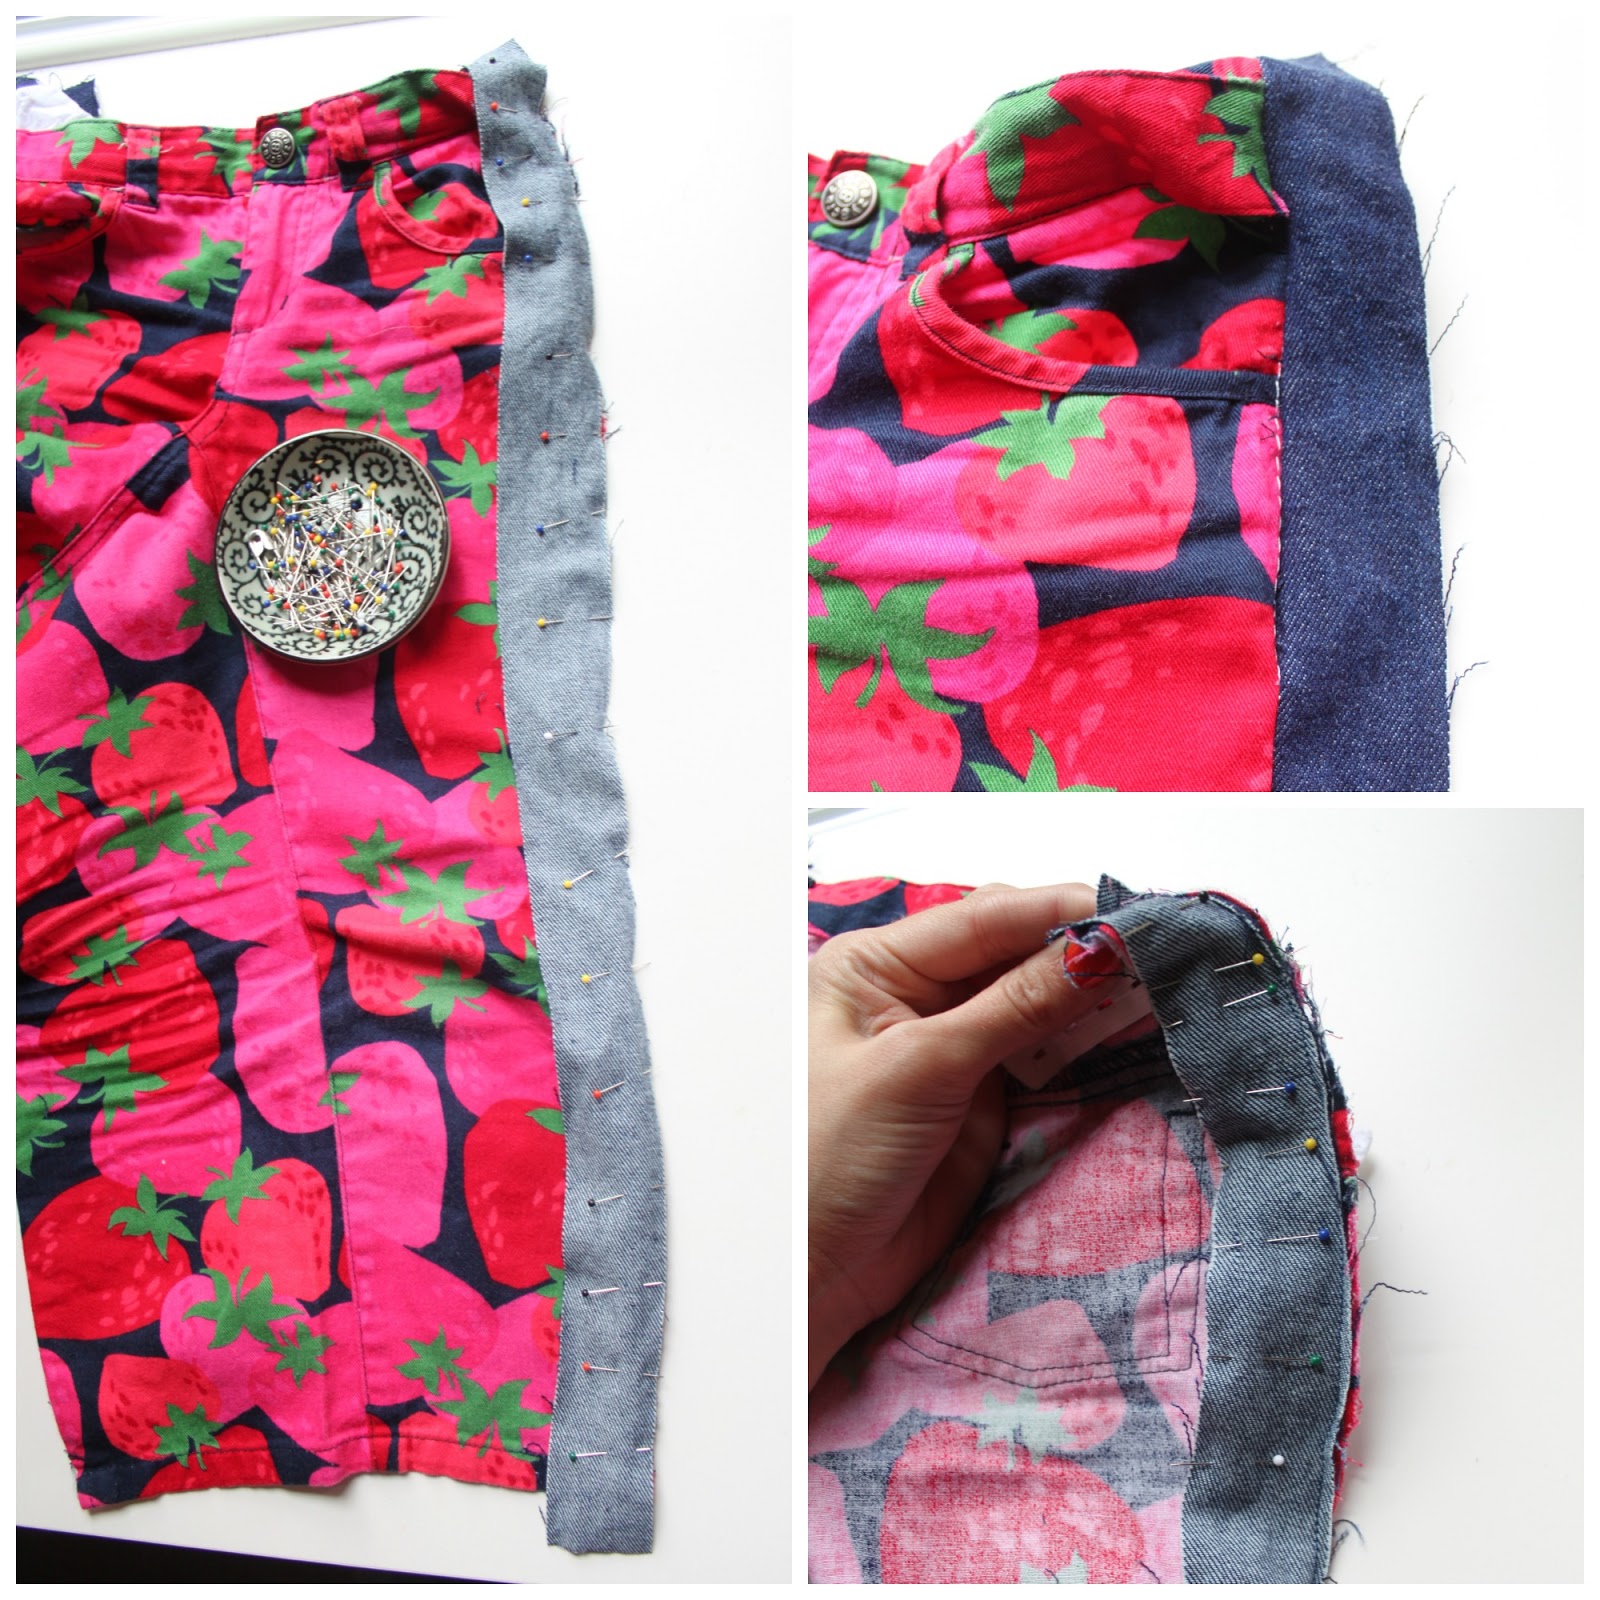

FIVE: pin your stripe along the raw edges and sew with your heavy duty needle.
SIX: unfold your tuxedo stripe and press.
SEVEN: Fold your pants so the raw edge of the remaining side of your tuxedo stripe matches up with the other side of your pant leg, right sides together, and pin all along the edge. Sew. Zig-zag or serge the long edges. Repeat steps 1-7 to attach the other tuxedo stripe.

Finishing:

ONE: fold your waistband down.
TWO: if you have an adjustable waistband, reinsert your adjustable elastic back into the hole where it was before.
THREE: turn the raw edge of your tuxedo stripe under, and stitch along the bottom of the waistband, following the original lines of the waistband.
FOUR: you should now have a nice, finished waistband!


FIVE: now to finish the cuff of the pants, just fold the raw edge a couple of times so the raw edge is contained (like you did with the waistband above.)
SIX: stitch along the bottom following the original hemline.


Now you have a pair of pants that won't cut off your circulation anymore with the added bonus of being trendy :) I'm a little jealous that my daughter has a pair of tuxedo striped pants and I don't. I'll have to change that soon!


While this method would certainly work for most pants, remember that you're adding width all over the pants, including the leg area, so the skinny jeans I added the stripe to are now roomier, straight leg pants. If you have pants that already have a wide leg, you may need to take the inseam in a bit after adding the stripe unless you don't mind the extra width. Make sense?

I hope this little trick helps to save some pants that were destined for the trash!

Thursday, October 10, 2013

Fall Felt Series: DIY Needle Felted & Hand Beaded Shoulder Embellishments


It's Day 4 of our Annual Fall Felt Series! Yay!  It's bittersweet, though.  So far, this is my favorite series of ours and I'm sad to see it coming to an end.

I'm super excited about this DIY!  It seems overwhelming, I know... but, trust me, it's worth the patience you'll invest in it!  This DIY Needle Felted and Hand Beaded Shoulder Embellishment is the most amazing addition to any boring, plain sweater you might have laying around.  

What you'll need:
A sweater
Felt
Thread
Seed Beads
Needle felting tool
Needle felting brush

For my felt, I used For this project I used Michael Levine's Classic Navy 100% Wool Felt.

This is the before.. boring, plain... BLAH.  It needs a little something extra, I thought.

I measured the length of the shoulder seam, from collar to sleeve.  I made my triangle exactly that long and half that wide.

Next, pin it in place and then try on your sweater to make sure you like where your embellishment lies.

Once you've settled on placement, starting punching away with your needle felting tool and brush.  Remove pins one at a time as you go along needle felting to make sure the felt stays in place.  When you get both felt pieces needle felted on, you can start your beading!  I just made up my design as I went.  I used tiny little copper colored seed beads and black thread.  There's really no technique to this other than exercising A LOT of patience!!  You just need to keep reminding yourself how amazing the outcome is going to be!

For the record, I am totally digging black and navy together right now!


Total outfit details: Sweater and Pants - HM, Shoes - Kenneth Cole New York, Necklace - Rosewood


Don't forget to check out LowPriceFabrics.com and grab the discount code from our sidebar!  We are so incredibly excited to have them sponsoring this series.  Seriously, their deals are to die for!


Check out our Link Party Page to see where we link up each week!
photobucket

Monday, September 9, 2013

Leather Belts to Wrap Bracelets


My husband's grandmother gave me a box full of belts a few months ago, and after picking out a few to use for crafts, I saved a few favorites for myself. The only problem is, Grandma must have been a size 0 when she wore them (which I certainly am not!) because they were tiiiiiiny! Most of them found their way into my craft room to be refashioned later, but I held onto this cute yellow skinny belt for myself, thinking I could make it work...that is until I tried to force said size 0 skinny belt onto my size 6 waist and it broke.

But when life hands you lemons and broken belts, you make jewelry!

So grab a few skinny belts from your closet (or from your local thrift store) and lets make some leather wrap bracelets.


SUPPLIES: leather belts (preferably skinny belts), scissors, leather punch or Crop-o-dile.


ONE: wrap your belt around your wrist until you're happy with the bracelet size, leaving some extra for the tail.
TWO: cut that bad boy.
THREE: use your leather punch or Crop-o-dile to punch holes in your bracelet to make it adjustable.


Now make a bunch! I bet you could find a ton of fun prints and colors at a thrift store. I'm hoping to find some neon or metallic belts to make into bracelets next.


Enjoy your new jewelry!


Check out our Link Party Page to see where we link up each week!
photobucket

Monday, August 19, 2013

Refashioned Tiger Shirt + Mini Tutorial


Shannon gave me this awesome tiger tee forever ago. I loved it and wore it a ton...that is until I managed to shrink it (or maybe it was always like that and I was blissfully unaware of that fact because I loved the cool tiger graphic.) Either way, it was time for me to retire the tiger tee, so it sat in my refashion giant box pile until I rediscovered it and decided that Connor needed this shirt.

I just love refashions, don't you? Breathing new life into a discarded piece of clothing can be so much fun! That may be one of the major reasons why I have a hard time getting rid of clothes - I always think about what they could become (and if you see me on "Hoarders: Buried Alive" you'll know why.)


For this tee, I decided to refashion it into a sleeveless tank for Connor. There are tons of great patterns out there that you could use (like Dana's muscle tee) but if you don't have a pattern, no fear. All you need to do is take one of your child's t-shirts and fold it in half with the sleeves tucked in, then trace around the shirt adding 1/2 inch seam allowance, and 1 inch on the bottom for the hem. Boom. Little guy tank. Then it's just a matter of placing your pattern on the t-shirt to be refashioned and cutting out. Then, cut the front neckline a little lower than the back, assemble as usual, and hem your neckline, armholes, and bottom. If you cut out your tank on the existing hemline of your shirt, you won't even have to bother with sewing a bottom hem.

And I'm all about saving time. Because then I get to spend more time with this guy:


All this kid needs to be happy is a stick. What is it with little boys? They can make weapons out of anything, can't they? And PS, it is extremely difficult to make a 2-year-old stand still for pictures when you're out of M&M's.


What kind of fun stuff do you have sitting in your refashion pile?


Check out our Link Party Page to see where we link up each week!
photobucket

Monday, January 21, 2013

CRAFT: Lace Back Sweater Refashion


I have some boring clothes. I blame it on my tendency to hoard clothes for so long that they go out of style, then come back in style again years later. It works out for me sometimes, but others not so much. Remember the whole vest and t-shirt fad? During that time, I bought a couple of vests that are really cute (and not cheap), but now they've been hanging unworn in my closet for the past few years. I'm still waiting for some sort of "vest trend" to return. I may be waiting awhile on that one.

Other times, I finally convince myself to give clothes away to Goodwill, only to find a few short months later that a new trend has started and I could have either refashioned, or simply just worn that exact piece of clothing again. I'm still in mourning over a favorite pair of burnt orange pants. On second thought, maybe I did the world a favor by giving those away. Only time will tell.

At least I can say I'm not wasteful though. I love new opportunities to jazz up my existing clothing. This lace back sweater refashion is a great example of that! I'm sure we all have plain, boring sweaters that could use a face lift - and all you need is a little lace.

SUPPLIES: sweater, lace (1/4 yard should do it - check the remnant pile of your local fabric store), disappearing ink marker, scissors, sewing machine and supplies.
ONE: first you'll need to make your pattern. Fold your sweater in half and lay it on some paper. Trace around your sweater using a 1/4-1/2 inch seam allowance. How big you want your lace bodice to be is up to you. I made mine go from the shoulders to an inch or two above the bottom curve of the arm hole. Note: you'll be keeping the existing neckline on your sweater, so take that into account when making your bodice.
TWO: cut out your pattern and place it on top of your shirt to make sure it's accurate. If not, just draft another!
THREE: fold your lace with the right sides together and place your pattern on the fold. Trace around it with disappearing ink marker. Cut out.
FOUR: your lace bodice should look something like this now.
FIVE: turn your sweater inside out and place your lace bodice on the back of your shirt. Trace around it using chalk or a disappearing ink marker. You could use your pattern you just made to do this instead.
SIX: use scissors to cut just the back of your sweater out, making sure to keep the existing neckline of your sweater.
SEVEN: pin the edges of your lace bodice to your sweater and neckline, making sure the right side of your lace will be facing the outside of your sweater.
EIGHT: turn your sweater right side out and press.


Pretty great, right? I have a bunch of other sweaters that I can't wait to try this method on!

Note: I found that the neckline on my sweater sagged a little because of the heaviness of the sweater compared to the lace. It's not bad and it doesn't really bother me, but if you want to play it safe you could always cut out the back entirely (including the neckline) and hem the lace, or go for a lighter weight shirt.


Check out our link party page to see where we link up each week!
photobucket
Related Posts Plugin for WordPress, Blogger...