


This month's Michael's Makers challenge was a fun one - Halloween costumes! To be honest, before we received this month's challenge, I had already made Connor's Minion Costume and I was happily calling it done on Halloween. When I got the challenge email, I started sweating a little. My go-to costumes usually involve sewing, and Michael's doesn't carry a wide array of fabric. Plus, all Haley never wants to be for Halloween is a princess. I was stumped.
The husband, kiddos and I decided to take a stroll through Michaels for inspiration, then my husband spotted a tie-dye kit. "How about making a hippie costume?" he asked. Brilliant! I grabbed an extra large youth shirt and some other supplies, and turned my daughter into a little flower child.

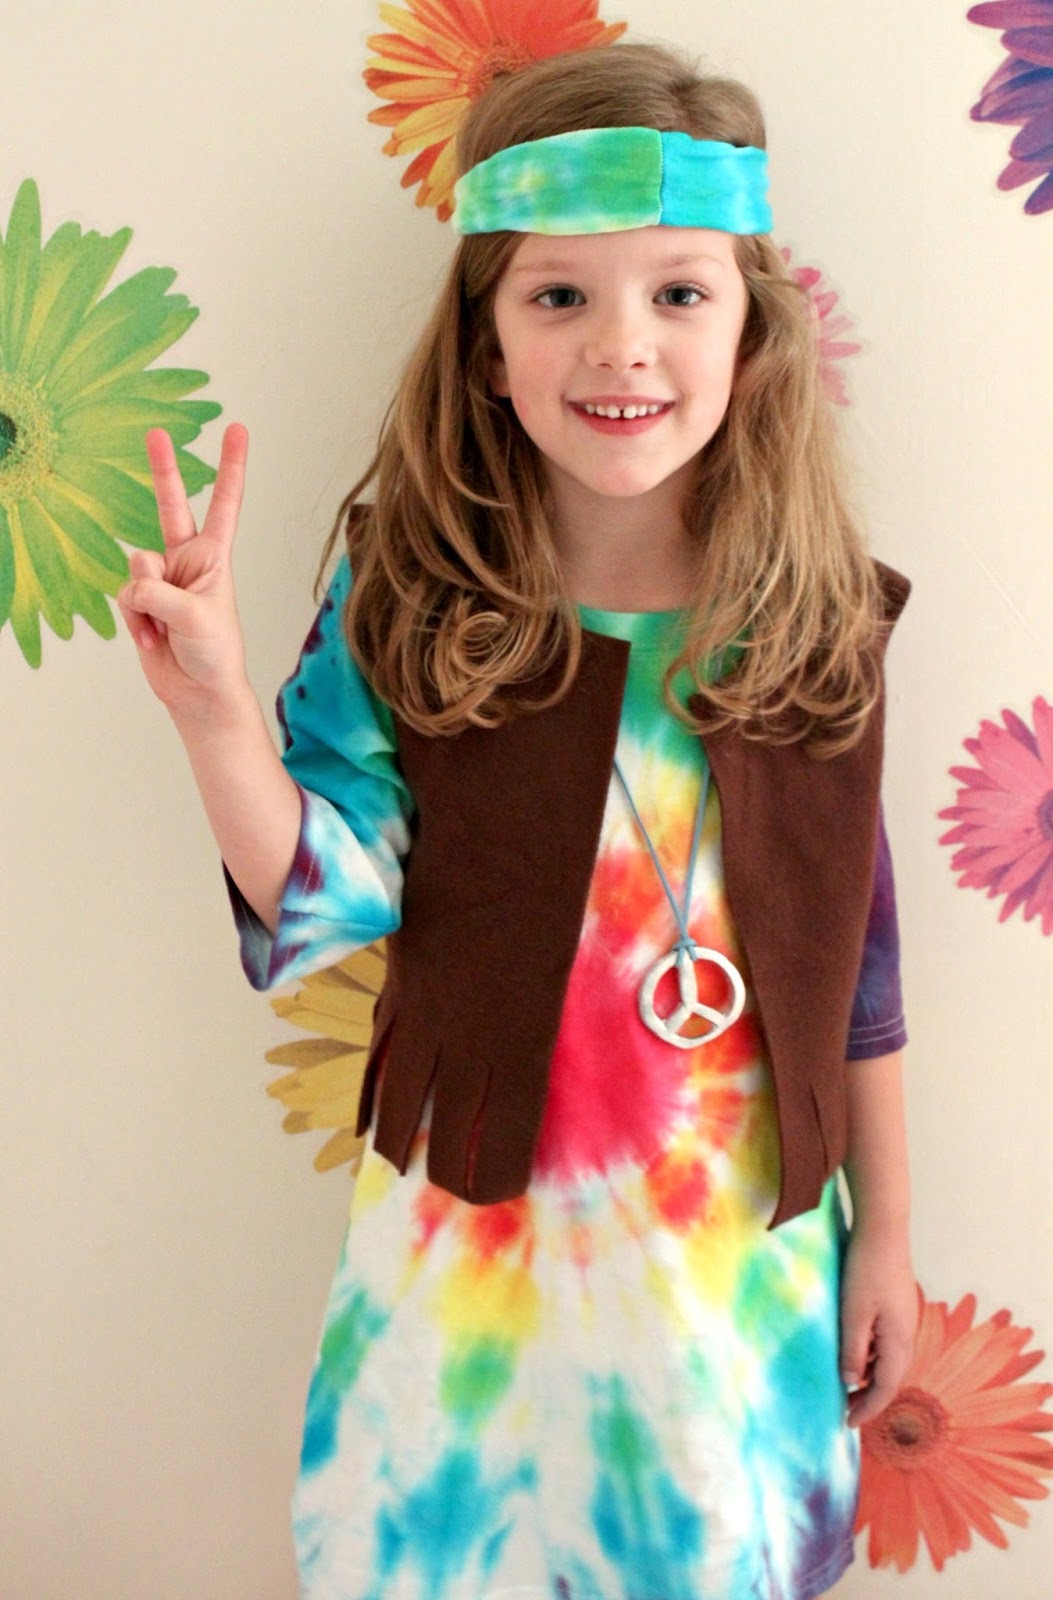
It's no princess costume, but it's colorful AND I managed to turn the shirt into a dress, so we were both happy. And that's a win in my book.

Wanna make one for the little flower child in your life?
SUPPLIES: For the tie dye dress- 1 white XL youth shirt (for roughly a size 6 dress, larger for a bigger child), Jacquard Tie Dye Kit, big plastic tub, sewing machine, scissors For the vest- a shirt that fits your child well, 1/2 yard fleece or felt For the necklace- suede lacing, modeling clay
Tie Dyeing Your Shirt:

It's important to dye your shirt first because it needs time to dry overnight. Also, you can make any tie dye design you like, but I'll explain how I made this particular design below.
ONE: first, pinch your shirt in the middle as shown.
TWO: wrap a rubber band (included in the tie dye kit) several inches down from where you pinched.
THREE: continue wrapping your shirt in rubber bands until you reach the bottom, then soak your shirt in soda ash as directed in your tie dye kit.

FOUR: use your tub to catch the excess dye as you paint your shirt, and begin to add your colors. Be careful what colors you place side by side, otherwise you'll end up with some unwanted colors blending together to make brown or black.
FIVE: you can combine colors to create other colors that don't come in the kit, i.e. red and yellow to make orange, blue and yellow for green, etc.
SIX: continue carefully adding your dye to your shirt, being sure to squirt paint into the folded crevices, and gently squeeze out excess dye as you go.
SEVEN: when you've finished dyeing your shirt, follow the instructions on your tie dye kit to wrap your shirt and let dry overnight.
Creating Your Vest:

ONE: take a shirt that fits your child well, and tuck the sleeves in. Fold it in half.
TWO: trace around your shirt, adding 1/2 inch at the shoulders and sides for seam allowance. Mark a dotted line several inches lower than your back neckline to indicate your front neckline. Cut out your pattern.

THREE: fold your fabric in half and place your pattern on the fold. Trace and cut out one back bodice. Fold your fabric again and place your pattern NOT on the fold and cut to make two pieces for your front bodice.
FOUR: you should now have three pieces: a back bodice and two pieces for your front bodice.
FIVE: place your two front bodice pieces on your back bodice with right sides together, and sew together at the shoulders and sides only.

SIX: use a rotary cutter and mat or scissors to cut vertical lines in your finished bodice for the fringe.
Turning Your Shirt Into a Dress:

ONE: after your shirt has soaked as directed, remove the rubber bands and unfold shirt. Wash as directed before moving on.

TWO: turn your tie dye shirt inside out. Take a shirt or dress that fits your child well and place it on top of your tie dye shirt. Sew along lines indicated in the picture above to make the shirt a more fitted A-line dress. No hemming required! Save the scraps that you trimmed off the side of your tie dye shirt for the headband.
Making Your Headband:

ONE: you should have 2 odd-shaped scraps left over from trimming your dress above.
TWO: cut off the top of each piece (the part that includes part of the sleeve) and discard.
THREE: place the widest part of each trimmed piece right sides together and sew or serge raw edge.
FOUR: fold your headband long ways, and sew or serge along the long end.

Turn your tube inside out, and you now have a coordinating headband!

If you'd like to also make a peace necklace, you can cut a rough peace sign out of modeling clay then bake and paint. Finish with leather cording. Your hippie outfit is now complete!


Truth be told, my daughter has no idea what a hippie is. She just really loves her new, colorful dress (and bonus: she can wear it whenever she wants!) I love costumes that can be worn beyond one night, don't you? And the fringed vest and peace sign really add a lot of fun detail to the whole get up.

It's totally far out, man
We hope you have fun making your own hippie costumes too! If you're still stumped on what to make, you can also check out Michael's Halloween Market for some great inspiration and DIY's.

adorable!! I love this, every part! Pinned!
ReplyDelete