Photobucket
Showing posts with label guest post. Show all posts

Wednesday, July 3, 2013

MAKE: Para Cord & Vintage Scarf Ring Necklace


Last month we shared this tutorial over at Whipperberry as our first post as part of the Whipperberry Creative Team.  (so exciting!)  We absolutely love working with Heather and are so grateful for the opportunity she's given us.

Of course, you all know how much we love going to estate sales and finding forgotten treasures. You see our photos on FB almost every weekend!  (We did a whole series about our strategies here.)  So, naturally, many many projects come from our compulsive saling.  Today I'm showing you how to make a necklace using para cord from the hardware store and a vintage scarf ring that I got for 25 cents at an estate sale. Yay!


As you can see, my cord got a little tangled.  It took me a good 15 minutes to even find the ends to begin untangling it. 
For my necklace I used 6 strands that were 6' long each, folded in half, with a tie around the middle.  That gives 12 - 36" strands to braid.
I braided 3 groups of 4 strands to get a thick, sturdy braid.  Once the braid is complete, tie some cord around the end and use a hot glue gun to secure the ends together.

Next, slide your scarf ring on.

The hard part is fixing the 2 ends together.  I used the tie that held the looped ends together and joined the 2 ends.  Use hot glue to secure any pieces you think may come loose.

Slide the scarf ring over the joint to hide it.  I made sure it wouldn't move by putting some glue inside the ring, then wrapping 5 loops of cord on either side of the ring. 


I actually love this necklace so much that it gets worn at least once a week. I'm actually wearing it right now!  You could even get fancy and change the shape of the necklace by using some copper piping elbow joints... I whipped one up, but forgot to take photos. I'll have to share those at another time.

Jen and I wish you guys a Happy Independence Day!  Have a blast partying and watching the fireworks! 


Monday, June 24, 2013

Whipperberry Creative Team - ESM Post #1!


Today we are over at Whipperberry doing our first project as part of the WB Creative Team!  We are so super excited.  Come over and check it out, along with the rest of Heather's amazing blog world! 


Wednesday, June 19, 2013

High-Low Racerback Tunic {Guest Post on Me Sew Crazy}

I've been trying to sew more clothes for me lately, so the recent hot days were the perfect excuse to make a new shirt for myself! I got adventurous and drafted my own pattern to make a high-low racerback tunic.

LOVE.


"Love" wasn't my first reaction when I found this fabric, but when I transformed it into this beautiful flowy tunic, it's become one of my favorite finds to date!

Head over to Me Sew Crazy to hear more about this unlikely fabric choice, and to learn how to make your own high-low racerback tunic!

Thursday, June 13, 2013

Metallic Checkered Planters at The Lovely Cupboard

Hey friends, how are you surviving summer so far? I think school is out for most people by now, and  my kids are already begging to be entertained every minute of the day (thank the good Lord for summer school!) My daughter seems to think that we are millionaires and can afford to go to the zoo, mall, and out to eat every day with each of her old classmates. I need to figure out a way to teach that girl that restaurants don't just hand out food for free if you ask nicely - which is what I spend half the day doing (growth spurt much?)

I'm so thankful to live in a city that has lots of activities for kids, so we have the zoo, strawberry picking (which we did recently - pics soon!), the pool, and tons of parks to go to. That should keep them entertained for a week or two ;) I'm just glad they still nap for me. How's a girl supposed to get anything done without nap time? I don't know how you nap-less parents do it. I think I may lose my sanity the day my daughter goes nap-free.

Anyways.

Here's a quick peek at some cute checkered planters I made to hold succulents and decorate my creative space. I ADORE succulents because I can't kill them! did I ever mention that I have a black thumb? True story.


Please tell me someone else has similarly bad luck with plants? I love the idea of having flowers, I just can't keep them alive. Maybe it's because I don't see the point in buying flowers because, while they're beautiful, they only last for a few short months. Now fruits and veggies are another story altogether because you can eat them. I did try to grow some cucumbers in 2011, but those turned out yellow and disgusting. Maybe I should stay away from fruits and veggies too... 

You can find the full how-to for making these metallic planters over at The Lovely Cupboard today!

Thursday, April 25, 2013

Made It for Me: Jess of Me Sew Crazy


Today's guest is Jess from Me Sew Crazy! Jess is incredibly talented and one of the nicest people you could talk to (plus she lives in Virginia, which is where I (Jen) am from, so bonus cool points there.) We've been long time followers of her blog, and now of the beautiful patterns she sells in her shop.

Me Sew Crazy is a constant source of inspiration. Jess is always coming up with a new project for her adorable kids or herself.

Here's Jess with her beautiful clutch tutorial!

----------------------------------


Hi there. My name is Jess the Sewing Rabbit, and I blog over at Me Sew Crazy. I am so happy to be here today as a part of Jen & Shannon's Made it for Me Series.

When I first started sewing, I was primarily focused on children's clothing. There is just something about dressing my little ones in handmade clothing sewn with love that fills me with joy. And as I continue to stretch and grow with my talent, I have started to take on bigger challenges such as trying new techniques, and sewing for myself.

I love upcycling thrift store finds, finding a way to turn something old into something modern and fresh. Finding my own style among piles of fabric and a pattern, and figuring out just what I can do with a piece of ribbon that I fall in love with. Which is exactly how this clutch came about. I was shopping our local fabric store when I came across this woven black and white geometric ribbon. It was love at first site. I just knew I could do something fabulous with it.


I thought I would share with you a mini-tutorial today, how you can turn your ribbon into workable fabric. This works best with cotton or woven ribbon, as the firmer, starchier types are not going to have much movement to it.

I used just over 3 yards of fabric to make the clutch pictured above.


You may consider adding a stabilizer at this point to the wrong side of your ribbon to really firm it up. I personally wanted a loose look and feel to this clutch - with strong zig zag stitches that showed when looking at it. If you do not want the stitches to show, another option would be to closely whipstitch the edges together using a handheld needle and thread.  And that's it!

For instructions on how to make the clutch pictured above, there are two tutorials to visit. With leather bottom - the Leather accent fold-over clutch tutorial at You and Mie, without leather - Fold-over Doily Clutch by Skirt as Top.

They are both great tutorials, and will get you on your way to a great looking purse in no time.


Just some of the supplies you will need to make it.  And to give you an idea on timing, I was able to finish this in one nap-time sitting. Not bad if I do say so myself!

The leather tassel, that was probably the hardest part. And I am not kidding.


Thanks so much for having me here today Jen & Shannon. I love your blog and am so thankful that you would want for me to be a part of it!


----------------------------------

I've never thought to turn ribbon into fabric - brilliant! And the pattern and colors are perfect. Thank you for sharing such an awesome clutch that we are totally making for ourselves.

Make sure to head over to Me Sew Crazy and follow Jess to see more of her projects and patterns.


Tuesday, April 23, 2013

Made It for Me: Stephanie of Henry Happened


Stephanie of Henry Happened is that mommy friend we all wish we were: down to earth, fashionable, and seemingly able to do it all. She describes her blog as her "playground for staying curious and always learning," which is something that Shannon and I always encourage others to do. Henry Happened is a definite must-follow blog full of inspiration and great DIY projects that make handmade chic.

I first started following Stephanie in 2011 and since then, I've loved following the evolution of her blog and her fantastic tutorials. At Henry Happened, you'll find projects that are both trendy and fun (her no-sew zipper jeans refashion is one of my favorites!)

We're so excited to have Stephanie here as a guest for the Made It for Me series.
Take it away, Stephanie!
-----------------------------------------

DIY Brooch Bracelet

Hello Eat.Sleep.Make readers! This is Stephanie from Henry Happened, and I write about DIY and style. Jen and Shannon's Made It for Me series really resonated for me because how often do moms get to make something pretty for ourselves? Or even shop for something new? My new clothes usually come from a 2-minute run through of Target when I'm there to buy diapers.

But today I'm going to show you something that I did make just for me. And love wearing because it has history and meaning, which makes it all the more special to me.

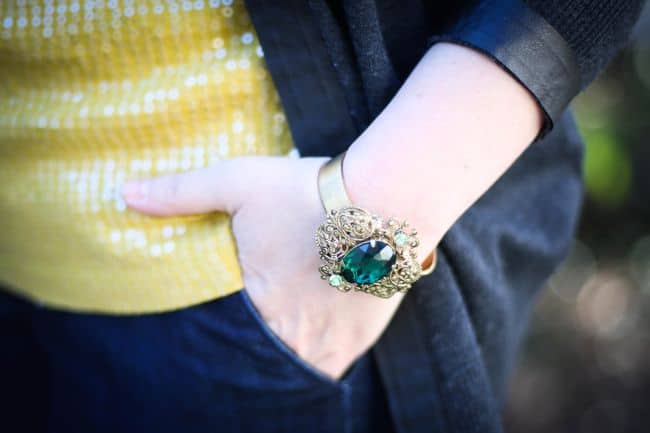
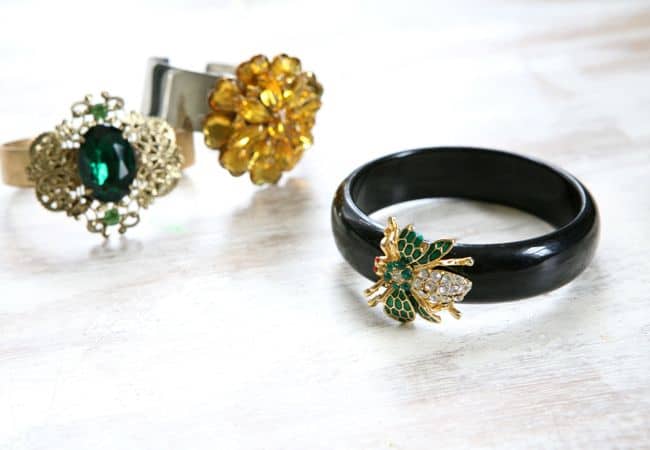
DIY bracelet with brooches

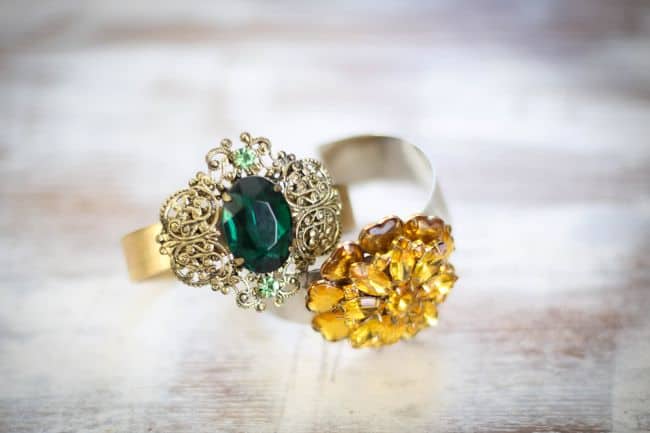
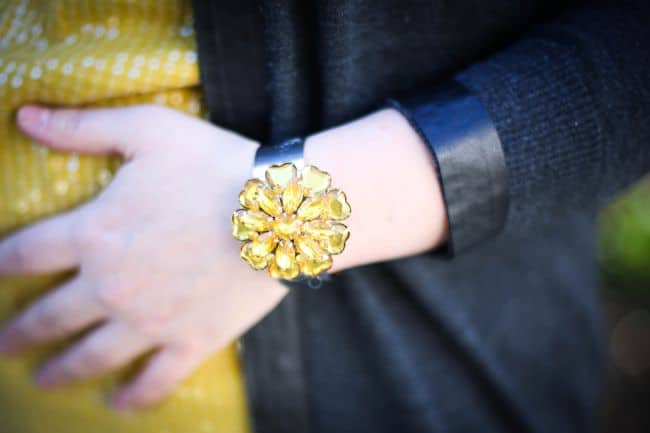
I love brooches - they are big and bold and colorful. Like most of my jewelry, the bigger the better! And I have quite a collection from my mother and grandmother (they liked big jewelry too, wonder where I get it from, huh?). But my antique brooches just sit there, looking pretty, on my dresser. Awhile back I made these brooch bracelets, just for me, so that I could wear my heirlooms more often.

These bracelets are super duper easy to make - probably less time than dashing through the jewelry aisle at Target. Just collect some old brooches - if you don't have a lonely collection already thrift stores often have these for cheap - and a couple of plain bangles. You can use metal or plastic bangles, whatever works for the brooch. Thrift stores are good for these too!

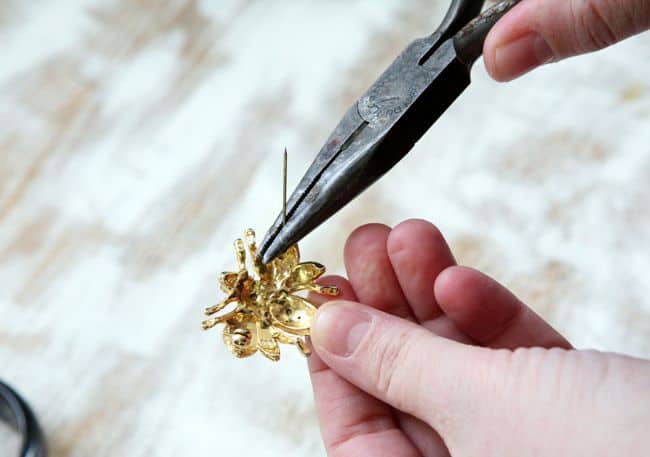
brooch bracelet tutorial

First remove the backing from the brooch. Wire cutters work best because you can get all they way down to to the base of the brooch, leaving a flat base.

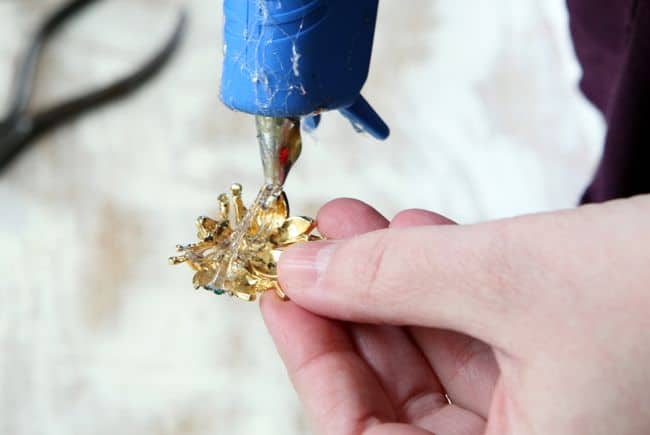
Bracelet tutorial with brooches

Then apply hot glue to the back and stick it to the bracelet. E6000 glue would also work but make sure you clamp and let it dry overnight to fully secure.

Brooch Bracelet DIYDIY Brooch Bracelet

That's all there is to it! Do you have brooches that you never wear? What do you love making just for yourself?

-----------------------------------------

Wow! Such stunning and sentimental pieces (and so easy to make!) If you don't have any brooches on hand, I bet you could find quite a few at your local thrift store or at estate sales. 

Thank you, Stephanie, for sharing such a gorgeous project. Make sure you visit Stephanie at Henry Happened and check out her other amazing projects!


 1. Glitter Striped Breakfast Tray 2. Homemade Cocoa Mint Soap 
3. Jewel Macrame Bracelets 4. No-Sew Zipper Jeans

Monday, April 22, 2013

Made It for Me: Andrea of Train to Crazy


Welcome to the first day of our Made It for Me series, where we're encouraging you guys to make something for YOU!

This week, we have invited some awesome guest posters to ESM to share projects they made for themselves, and for our first guest, we welcome the multi-talented Andrea of The Train To Crazy and Go To Patterns!

I'm sure most of you already know Andrea. She not only runs her own blog and link party each week, but she also heads up Go To Patterns, which hosts a team of extraordinarily talented designers and their patterns. I've been blog stalking following Andrea for years, and her talents never cease to amaze. How anyone can manage to raise 4 children, run a blog and a pattern shop is beyond me. I don't know how I manage to get myself out of bed and dressed half the time (and sometimes getting out of my pj's doesn't happen at all.)

Please help me welcome Andrea!

--------------------------------------

Thank you so much for inviting me to this great series! I was so glad to have a reason to sew for me! I usually sew for my kids though I do occasionally manage to sew something for myself. Lately it's been mostly Casual Ladies but for this challenge I made myself a purse. With leather corners. I've been wanting to make one like this for ages.

Fun handbag with leather corners #sewing by thetraintocrazy.com

I had picked up some leather scraps on a recent shopping trip. This leather is SO soft and wonderful. It is most likely really nice leather but I think I paid $5 for this bit I used.

Fun leather corners on a handbag. Great pattern! #sewing

I managed to just about match up the sides perfectly. When you look at it straight on it actually looks almost perfect.

The sewing pattern is the Rebecca Hangbag by Bev from Flamingo Toes. I omitted the ruffle that goes down the front. I actually think it would have been super cute if I had done the ruffle in the gray linen. But I wanted something a big simpler so I'll have to do the ruffle on my next one.

zip close handbag sewing pattern

I love a handbag that has a zipper closure. I don't exactly keep mine neat and tidy inside so this hides the chaos that lies beneath.

Rebecca-bag-interior-2

Confession: I intended to have the entire interior made from that gorgeous Kaffe Fassett but cut the fabric wrong and didn't have enough! So one huge pocket had to do. I like it though. A great pop of color.

Rebecca Handbag sewing pattern. Love it!! #sewing

All in all I do love the bag. I think I would keep the ruffle next time and maybe make the handle out of leather as well. But I didn't have enough because I cut the leather wrong as well. Do you ever have projects like that where you just seem to mess up everything? At least I love the results!

Thank you so much for having me! Stop on by my blog to say hi! And please also stop by my pattern shop to find something fun to make!

 -------------------------------------- 

First off, what a gorgeous bag! I love gray linen and leather together, so classy. Also, I'm more than a little jealous of your shopping trip to L.A. I would be poor if I had access to all of that wonderful fabric :)

Thanks for sharing, Andrea! Make sure you check out The Train to Crazy and Go To Patterns for more awesomeness!

Wednesday, April 10, 2013

Guest Posting @ The Lovely Cupboard


Hey all!  Join us today over at The Lovely Cupboard.. I've shared a cheery spring centerpiece that I made so I can host dreamy little garden parties this season!  And check out the rest of Heather's awesome blog, too, while you're over there!! 


Thursday, April 4, 2013

Guest Posting at Me Sew Crazy!

So confession: Shannon and I rarely work on projects together. It's not that we avoid it or anything, plus we live right down the street from each other so we don't have that excuse. The truth is we both get wrapped up in our own projects and lives that, by the end of the week, all we want to do is relax and have a scary movie night. They are glorious. And Golden Oreos are usually involved.

But, we finally did it! And it was SO much fun!


Shannon and I share a love of creativity, but each of us has our own separate strengths. As I'm sure you've noticed, Shannon is an amazing artist (you can see one of her original drawings in DIY wood matting tutorial), and I love to sew. We thought it'd be fun to combine two of our talents into one project - and the result is this flutter top! Why did we ever wait this long to work together??

We're sharing the tutorial on how to draft and create this Flutter Tee at Me Sew Crazy today. Come and learn how to make one, and show us some comment love! (As part of our New Year's resolutions, one of my goals was to get better at posing for photos. It's working......right? :)

We hope you like it! We plan on working together a lot more on projects and making it a regular thing here on our blog.

P.S. Jess is crazy talented (as I'm sure you already know,) and she also has some fantastic patterns in her shop. If you're not already, you definitely need to follow her blog and pick up a few of her patterns while you're at it!

Thursday, March 14, 2013

Fiery Tomato-Basil Mac and Cheese {Guest Post}

Today, we have a yummy recipe from Meredith K. on behalf of Hunts. I love macaroni and cheese, (and my kids live off the stuff) so this is the perfect easy weekday meal for my family! 

Enjoy!

-------------------------------------

Fiery Tomato-Basil Mac and Cheese

Cooking for the Week: Fiery Tomato-Basil Mac and Cheese

When it comes to weekday cooking, there’s no better timesaver out there than leftovers. Some
nights it’s nice, even therapeutic, to whip up a leisurely meal in the kitchen, but on nights when you’re
ready to curl up on the couch with comfort food and a glass of wine, cooking can feel like a chore
instead of a treat. On nights like that, frozen meals just don’t cut it, which is where yummy leftovers
come into play.

Leftovers can get a bad reputation, but in reality, many casseroles and baked dishes actually improve
over a couple of days since the flavors get a chance to really blend together the longer they sit. They’re
also perfect to have around for busy weeknights or days when you just don’t feel like doing much of
anything in the kitchen. Plus, having a real meal for dinner is usually much more satisfying than any
frozen option, and is also much cheaper than delivery or takeout.

This fiery tomato-basil mac and cheese makes a whopping 16 servings—which is a very good
thing, because you’ll want to eat this dish for days. Mac and cheese is one of those meals like chicken
parmesan or your favorite easy
lasagna recipe
that’s always just so good, no matter how old you are or what kind of day you’d
have; a bowl of creamy mac and cheese makes bad days significantly better and kicks good days up to
great. Make this mac and cheese on a lazy Sunday and keep it in the fridge or freezer for nights when
you’re craving a good, quick meal. Enjoy!

Fiery Tomato-Basil Mac and Cheese

Prep Time: 50 minutes
Total Time: 1 ¼ hours
Serves: 16
  • PAM® Original No-Stick Cooking Spray
  • 1 16 oz package dry elbow macaroni, uncooked
  • 2 14.5 oz Hunt’s® Fire Roasted Diced Tomatoes, undrained
  • 1 cup packed fresh sweet basil, chopped
  • ½ cup unsalted butter (1 stick)
  • ½ cup all-purpose flour
  • 2 teaspoons kosher salt
  • 5 cups whole milk
  • 4 cups shredded sharp cheddar cheese
  • 1 ½ cups Italian-style breadcrumbs
  • 1 cup grated Parmesan or Romano cheese
  • 4 tablespoons unsalted butter, melted
  • Basil leaves for garnish
Preheat oven to 400°F. Spray a 15x10-inch (4 quart) casserole dish with cooking spray (or divide up the mixture between 2 smaller dishes, like an 8x8-inch and a 13x9-inch). Cook macaroni according to package directions. Drain and place in a large bowl. Add undrained tomatoes and basil. Stir to combine and set aside.

For the sauce, melt ½ cup butter in a saucepan over medium heat. Whisk in flour; continue whisking over medium heat 5-6 minutes or until flour mixture is browned. Add salt; gradually whisk in milk until combined. Constantly whisk sauce 10-12 minutes or until it thickens and starts to simmer.
Remove from heat and add cheddar cheese. Gently mix until completely melted. Pour cheese sauce over macaroni dish and stir to combine. Pour into prepared dish (or dishes).

For the topping, combine breadcrumbs, parmesan cheese and 4 tablespoons butter. Spoon evenly over the macaroni mixture. Bake 15-20 minutes or until top is golden brown. Garnish with basil leaves if desired.
Author Bio: This is a guest post by Meredith K. on behalf of Hunt’s®. For other easy, family- friendly dinner recipes, from macaroni to easy meatloaf recipes, visit www.hunts.com

---------------------------------------------------- 

Thanks for sharing, Meredith! Be sure to check out www.hunts.com for more fantastic recipes like 30-Minute Chili or Baked Ziti Casserole.

Monday, January 28, 2013

Guest Posting on Kojodesigns!


I'm sure you all know of the Color Your Summer series that the awesome ladies of Kojodesigns and Delia Creates do each year. Well this winter, they decided to team up again for a new series called Winter Whites, and we get to be part of the lineup! We're SO excited to be sharing alongside such incredibly talented bloggers.

Each person was challenged to create a project using white, neutral or metallic colors, and we decided to share this incredibly yummy recipe for Snowy Road Fudge, which is a wintry spin on traditional rocky road.

Come check out our recipe HERE and say hi!
Related Posts Plugin for WordPress, Blogger...