Photobucket
Showing posts with label birthday. Show all posts

Wednesday, September 18, 2013

A Grown-Up Paper Plane Birthday Party

Last weekend we celebrated my husband's birthday.  It was a last minute celebration that I threw together.  I wanted something fun, but classy.  Something easy an inexpensive, but that looked like it took me hours and hours to plan.  Isn't that really the goal for any party thrown?  I settled on paper airplanes.  I'm not entirely sure where this idea came from, but once I started working on it, it came together seamlessly!  I bought an old outdated atlas from Half Priced Books to make some planes, threw a globe in the mix and used my vintage film canisters to give the table some dimension.  For the cupcakes, I tried to make the frosting look like clouds that the planes were hovering above.  All in all, I love how it turned out!

We had such a blast with our families and having all the kiddos running around torturing our poor animals.  Needless to say, we all passed out around 9pm after all the craziness subsided.  It was so worth the exhaustion, though!


Check out our Link Party Page to see where we link up each week!
photobucket

Thursday, March 7, 2013

PARTY: Tangled Party Games {Tangled Birthday Party}

--Click HERE to see all Tangled-related posts and DIY's--

This birthday party was so different for me because her past few birthdays have consisted primarily of family and close friends. This year, we allowed Haley to invite her whole preschool class, so I was a little intimidated because I knew I had to entertain a mass of children. I also had the added challenge of making sure the games weren't too "girly" since more than half of her schoolmates are boys. After scouring blogland for inspiration, and coming up with a few ideas myself, I decided on 4 different games/activities that turned out to be a lot of fun (and they're preschool friendly!)

1. Pin the Nose On Flynn Rider
I've seen this one on several blogs before (sorry, but I'm not sure where it originated. If you do, please let me know so I can cite appropriately!)

I had a second engineer print made, just as I had for the "wanted" photo booth HERE, but this time I didn't cut out the middle. The poster was simply taped to the wall with tape.


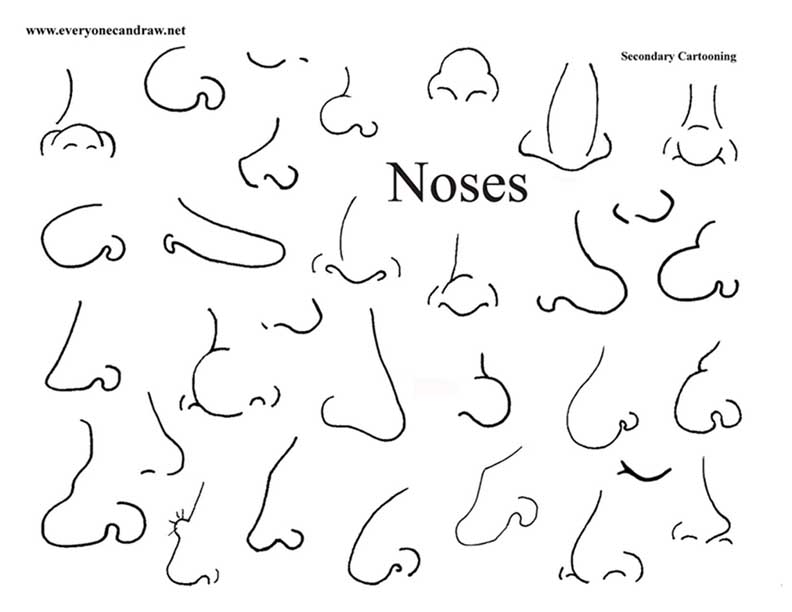
I found the noses online by googling "nose caricatures." After sorting through a bunch of nonsense, I found this page full of perfect noses on everyonecandraw.net. I used my Silhouette Cameo to cut them out on card stock.


I put double sided tape on the back of the noses, and each child was blindfolded and instructed to try to "pin the nose on Flynn Rider." The kids got clever on me and, as they went to "pin" the noses on, they felt with their fingers where the other kids had taped the noses so they all got the noses right in the middle so everyone got prizes :)

2. Feed Pascal:

For this game, I found the template and tutorial on how to make cute Pascal party blowers on DisneyFamily.com. I then attached some adhesive velcro to the tip of Pascal's "tongue" and adhered the other side of the velcro to some fruit images I printed out. 

The kids were then challenged to use Pascal's tongue to pick up as many pieces of fruit as they could in under a minute. 

3. Tangle a Friend

(No picture because we didn't get to this one.) I partnered the kids up and gave each partner a roll of yellow streamers. The kids were told to tangle their partner up in the streamer as fast as they could. The child who tangled up his partner the fastest won a prize.


4. Make Your Own Lantern
I purchased a stack of colored card stock and adhesive foam shapes and allowed the kids to decorate their own lanterns. I also brought my daughter's supply of stickers, markers and crayons from home. When the kids were done, I used a hole punch to punch 2 holes in the top and attach clear line to hang. Easy and cute!


I will say, after all the preparation I did for the games, the kids were too busy making their own fun (which was great!) so we were only able to do 2 of the games. Next time, I think I'll stick to a craft and 1 game. 


Check out our link party page to see where we link up each week!
photobucket

Wednesday, March 6, 2013

PARTY: Wanted Poster Photo Booth {Tangled Birthday Party}

--Click HERE to see all Tangled-related posts and DIY's--


I thought it would be a lot of fun for both the kids and parents to have a photo booth at Haley's Tangled party.  The kids are finally at the age where they like to dress up and pretend, plus I thought it'd be a fun keepsake for the parents to take home with them.

Since Flynn Rider's wanted posters show up several times in Tangled, I immediately pictured the kids posing behind a wanted poster. But how to make one the size I wanted without making it look corny? Mandy of Sugar Bee Crafts posted a great tutorial last year on how to make a giant picture by ordering an engineer print from your local office store, so that's exactly what I did.

I found the Flynn Rider poster HERE and used Photoshop to change it to black and white and remove the "wanted dead or alive part." I wasn't sure how parents would feel about that part ;)

 
From there, I went to my local FedEx Kinkos and had them print the smallest engineer print they had (I believe it was an 18x24) in black and white for only $0.75/foot. They do print engineer prints in color as well, but the cost is $8/ft. and I wasn't feeling like spending that much for something I was about to cut up. I used spray adhesive to mount it to foam board (found at Walmart) and then I used my X-Acto knife to trim the edges and cut out the middle.  Clear line and packing tape was all I needed to hang the poster from the ceiling so the kids could stand behind it for pictures.  

As you can see, Haley loved it:


For the props, the only dress up stuff that I had on hand is princess gear - and  I knew the boys would hate that - so I opted for paper props instead. I found the awesome printables on Oh Happy Day! HERE and HERE. Jordan saved my butt, I was about to try to design my own and they wouldn't have looked near as good as hers! I simply glued them to wooden skewers and let the kids model away.


We simply hung the sign from the ceiling with clear wire and packing tape. As you can see, the kids loved it!


C
heck out our link party page to see where we link up each week!
photobucket

Tuesday, March 5, 2013

PARTY: Tangled Birthday Invites {Tangled Birthday Party}

--Click HERE to see all Tangled-related posts and DIY's--


Yet again, I couldn't keep myself away from making birthday invites, even after the torture I went through to make Connor's Knight Party invites. I had SO much fun planning Haley's Tangled birthday party that I didn't need to force myself to be creative (which happens a lot more than you might think :) With all my crazy DIY-ing, I initially considered buying invites; but then a thought came to me: "Why not make themed invites that require the recipients to "untangle" Rapunzel's hair to get all the party details?"

You know I couldn't buy invites from a store with inspiration like that.

I designed the cards in Photoshop and made them in such a way that the card reads "Untangle for more details" while the ribbon "hair" is wrapped around it so the reader understands that they have to unwrap the ribbon for all the party details. Fun, right? I did it this way to work in the party theme and to make it interactive.

I won't be sharing the file for this one (sorry, I hope to possibly sell it eventually!) But I will share how I made it in case you want to do something similar.
Use double sided tape to tape the end of some ribbon to the back of the card. Proceed to wrap the ribbon around the card, hiding the details of the party so that only the wording "Untangle for more details" is visible. Tape the other end of the ribbon down with more double sided tape and tie with skinny purple ribbon.

That's it! Pretty simple really, but so fun and whimsical. You may have noticed that the colors of ribbon in the main picture and tutorial are different shades. Initially, I wasn't able to find the perfect shade of golden yellow that I was looking for. Then (after I had already made and distributed all of the cards!) I found the perfect golden grosgrain ribbon at Hobby Lobby. Sigh. Oh well, I still think they turned out great and I think I'm the only one that cared about the ribbon color.


Check out our link party page to see where we link up each week!
photobucket

Monday, March 4, 2013

PARTY: Tangled Birthday Party {Food and Decorations}

This past weekend, my little girl turned 4! She is a little girly girl (unlike I was at her age!), so her heart was set on having a Tangled birthday party. I got inspired and started planning everything a little over a month ahead of time so I didn't feel like a mad woman the day before the party.

I had so much fun planning everything and went crazy DIY-ing almost everything except the plates and plastic ware. (But I'm sure I would have done that too if I could ;) With all of the energy and time I put into everything, I would hate to try to shove so many tutorials and pictures into one giant post, so this week is going to be dedicated to all the details and DIY's that went into putting on a Tangled birthday party, from the invites I made to games and the handmade favors.

If your child is having a Tangled party, this whole week is for you! And even if you aren't planning a Tangled party, you can at least enjoy the pictures I hope :)
Today, I'm primarily going to focus on the decorations and food. Later in the week, I'll share tutorials for the favors, photo booth, and games we played. Also, HUGE thanks to Shannon for taking most of these pictures! I was running around like a mad woman trying to get 14 children age 4 and under to focus on activities :)

The Food
I love party food! I'm a big grazer, so parties are the perfect excuse for me to load up my plate with a little of everything. The food for this party was a little more difficult to plan because several of the children in Haley's class have gluten, egg, and peanut allergies. Add that to the fact that we were expecting close to 40 people at lunchtime, and I had quite the challenge!
For those with gluten and tree nut allergies, I made gluten-free Rice Krispie treat "paintbrushes," which were Rice Krispie treats (made with gluten free Rice Krispies) cut in rectangles and dipped in colored candy melts (Wilton candy melts are gluten-free by the way!) I then inserted an ice cream stick into each and stuck them into foam blocks covered in tissue paper. Please ignore the fact that they're falling over. Ahem.

For those with tree nut allergies, I made little Sunbutter and jelly sandwiches cut with a sunburst cookie cutter I purchased from the Cookie Cutter Shop (quick shipping and great price!) I made regular PB&J's for the rest of the kids. A fruit tray and Nutella fruit dip were also a quick and easy addition for those with tree nut allergies. Just mix greek yogurt and Nutella and instant fruit dip!

Aside from the specialty foods, we also had PB&J's, pink yogurt covered pretzels, pigs in a blanket, chips, Bagel Bites, and pink lemonade with lemons floating it it (are you sensing the pink, yellow, and purple theme?) My absolute favorite food, though, were the sunburst cookies. 

These cookies turned out so pretty! I've never worked with royal icing until this weekend and let me tell you, it's time consuming. I knew I had to have sun cookies, and the only way to make them look as polished as I wanted was to use royal icing. What I didn't anticipate is that that decorating 60+ cookies would take 5 hours. Worth it? Yes. But man, my frosting muscles hurt. Again, I used the sunburst cookie cutter from The Cookie Cutter Shop.

The royal icing recipe I used is from Bridget at Bake at 350, and it was so much better than I expected! Just the right flavor and consistency. Bridget also explains how to decorate with royal icing to get the best results. This is definitely my go-to royal icing recipe for the future. The sugar cookies were from a mix, I'm not ashamed. You gotta draw the DIY line somewhere!

The Cake
Oh the cake. It turned out just like I wanted. I was going to originally purchase a Rapunzel cake from a local bakery, but then I saw Martha Stewart's ruffle tower cake and I had to make one. The cake was a white cake mix, and the vanilla buttercream frosting is Shelly's from Cookies and Cups. My husband was disappointed that I didn't make cream cheese frosting, but he at the cake and lived, and everyone else seemed to like it since we only had 3 slices left over.

I dyed the layers ombre-style in 3 different shades of purple because, why not? I was already crazy enough to shut 14 young children into a small space and load them up with sugar, so it might as well be pretty. The cupcakes were strawberry at Haley's request, and not as pretty because I ran out of time or else they would have been ruffled too. I also made the "happy birthday" banner and attached it to skewers with yellow yarn.

The Decorations
 I wish I would have taken more pictures of the decorations, but again, busy running around like a crazy woman!

I made the tissue paper flowers on the wall by folding and stapling together pieces of tissue paper. The flag bunting was made by cutting out triangles and sunburst shapes with my Silhouette Cameo (love that thing!) and stringing them onto ribbon. Side note: Silhouette cutters do NOT love construction paper, so don't try it. It's no fun to pick all the little fibers off of the cutting mat either. In retrospect, I should have just stuck with card stock.

The tablecloths were yellow and purple to go along with the theme, and I also made some yellow table runners for the food tables from plastic tablecloths. Other than that, we tossed a bunch of pink and purple balloons on the floor for the kids and called it a day!
  

Haley had the BEST time, which she kept repeating to me over and over. Her favorite part of the whole party? When everyone sang happy birthday to her (as you can tell from her big smile in the picture above.)

I am beyond tired, but so happy with how everything came out! The kids had a great time - and that's all that really matters. I feel so amazingly blessed by all of the wonderful friends and family that came to celebrate my little girl turning one year older.

 Make sure you check back the rest of the week for more Tangled-related DIY's!


Check out our link party page to see where we link up each week!
photobucket

Thursday, November 29, 2012

Knight Party: How to Make a Knight's Tunic


If you're going to throw a medieval knight party, you have to have the traditional knightly garb, right? I mean, what is a knight without his tunic? Unfortunately, even little knights have expensive clothes. I hunted around the internet and found several outfits that were really great, but not so great on my budget. Rather than buying an expensive costume from a store, I dug into my fleece stash and came up with this awesome tunic. Why fleece? Mainly because the edges don't fray, so that meant no hemming for me and one less thing to worry about :)

Connor's been going through this stage where he sees his sister putting on princess dresses and little heels and wants to do the same, but of course my husband wants none of that. I'm hoping this little tunic will become one of his new favorite dress up outfits!


SUPPLIES: shirt to use as a template, paper for your pattern, fleece for the main fabric, 1 sheet of white felt, leather scraps, sewing machine and supplies.

Making Your Pattern:
ONE: fold your template shirt in half and place it on the edge of your paper. Trace around your shirt with a 1/2 inch seam allowance, and be sure to make the bottom longer (a little above the knees.)
TWO: cut out your template.
THREE: fold your fleece in half, right sides together. Place your pattern on the fold and trace around with chalk or disappearing ink marker.
FOUR: cut out and unfold your fabric. This is your back piece. Repeat to get your front piece but cut the neckline lower for the front.

Assembly:
FIVE: cut out a cross from some felt. Pin to the front of the tunic and sew around the edges to attach.
SIX: on the bottom of your tunic, find the middle and draw a line several inches long.
SEVEN: cut a slit as shown in the picture above, making sure to round the corners on the bottom.
EIGHT: pin the shoulders and sides together and sew the sides and shoulders only to attach.


Turn your tunic inside out and that's it! Again, since the tunic is made of fleece the edges won't fray, so I didn't bother hemming the bottom or finishing the neckline or armholes. For the belt, I simply cut a long strip of leather long enough to tie around his waist in a knot.


I made the tunic large on purpose so Connor could grow into it. It's really the perfect size for my almost 4-year-old, so hopefully it'll last him awhile. Layer a long sleeve gray shirt underneath to get more of an "armor" look. If it has a hood, even better! If you want to get really creative with everything, pair the outfit with some black leggings and boots. Since I had neither, gray pants and bare feet worked just fine for this little knight :)


Check out our link party page to see where we link up each week!
photobucket

Wednesday, November 28, 2012

Knight Birthday Party: Invitations


For some strange reason, I've gotten it into my head that I have to make every birthday invitation for my kids' birthdays by hand instead of buying them from a store. I'm not sure where the notion came from, but for the past several birthdays, I go into a designing frenzy where I sit in front of my computer with a Diet Dr. Pepper and duke it out with Photoshop in an attempt to come up with the perfect themed invite. Just when I think I'm finished, the perfectionist in me comes out and I have to tweak this and that until my contacts dry out from lack of blinking and the rational side of me whispers "you should probably buy the invites from a store next year."

I'm sure that won't happen, but maybe by the time my daughter's birthday rolls around this March, I'll come back and re-read this post and remember how much time it takes to design an invite and why store-bought invites are a great idea. Maybe. Until that day comes I'll keep having fun making invites, and Connor's knight birthday party was no exception.


With the whole "medieval" theme in mind, I wanted the invite to have a worn look to it, so I Googled around and found a great free texture to use as the background. I then designed a shield in Photoshop using some free clipart, and added some wording using an Old English font. Not too hard (aside from all my perfectionist tendencies lol) From there, I printed it on card stock and ripped the edges to give it more of a "worn scroll feel."


I then rolled each invite like a scroll and tied it with ribbon.


Ta-dah! Lots of cute little scroll invites for Connor's knight party. They're a really fun change from handing out a traditional invite.


Check out our link party page to see where we link up each week!
photobucket
Related Posts Plugin for WordPress, Blogger...