Photobucket

Friday, June 28, 2013

We Are Loving Right Now - Volume 9 - July 4th Treats Edition


July 4th is next week, and I'm sure everyone is planning fun get-togethers with family and friends! We're going to be traveling to Virginia to visit family, so we're looking forward to the beach, fireworks, and of course plenty of yummy food.


Here are a few fun patriotic treats to whip up for your July 4th party!

Firecracker Treat Pops from The 36th Avenue

Edible Pinwheels from Studio DIY

Mini Patriotic Pies from Just Another Day in Paradise

Fourth of July Flag Cake from Glorious Treats

Patriotic Drink from Lil Luna

Snow Cone Cupcakes from Bakerella

--------------------------------------

Remember, you can find all of the things we love pinned to our "We Are Loving Right Now" board in Pinterest (be sure to follow us if you don't already!)

Also, a reminder that Google Reader will be going away as of July 1st!! To make sure you don't miss all of our great posts and projects, be sure to follow us on Bloglovin', which is another great feed reader that tracks all of the blogs you love reading (similar to Google Reader.) You can also find us on Pinterest, Facebook, and Twitter.

Have a happy Fourth!

Thursday, June 27, 2013

Self-Drafted Jean Shorts


Is it too much to ask for a pair of jean shorts that cover both my cheeks? Apparently so, because I shopped around all over creation and couldn't find a pair with proper coverage. I'm not asking for shorts down to my knees, just ones that completely cover my caboose! After my fruitless search, I came to the conclusion that, if I wanted a pair to fit the way I wanted, I'd have to make them.

As scary as the thought of making shorts for myself was, I was feeling pretty unstoppable after learning how to make a functioning fly and pockets from the Classic Chinos pattern that I tested for Peek-a-Boo Pattern Shop. I have never been one to make a muslin for any pattern, but I thought if there was ever a time that I needed to start, it would be now since I've never made pants for anyone bigger than a 4T. I used a pair of shorts that fit me well to draft up the muslin, and when I thought I had it right, I dove right in using some denim I scored for dirt cheap at an estate sale.


When I had assembled everything, I found that I had somehow made the pants several inches too big, so I had to go back and add front and back darts. I'm not sure if darts are even kosher for jean shorts, but it worked.


I installed a hammer-on button, working fly, lined pockets, and check out the fancy stitching on those back pockets! I thought, if I was going to go for it and make myself jean shorts, I better go all the way and give them some fancy stitching while I was at it. It makes them look less handmade (and I'm kind of impressed that both sides are even. Whew!) Even after adding darts, I found that the pants were gaping some in the back, so I added a small piece of elastic in the back waistband. I wish I didn't have to add that, but it's really not very noticeable and it gets the job done.


I actually sewed a proper cuff on the bottom of the pants, which looks invisible from the outside (i.e. the stitches are hidden by the cuff itself, and they're sewn on the side seams.) If anyone would like a tutorial on how to make nice pant cuffs, let me know! It's a fun trick to learn that gives pants a nice finished look.


When I was done, I had a nice pair of jean shorts that cover all the things they're supposed to.


I wish I could share a pattern for these, but my pattern is far from perfect. I'd like to make a few more pairs in the future, so if I ever get it right I'll be sure to share :) Until then, I found this great free tutorial and pattern by Owly Baby for Imagine Gnats HERE.

Check out our Link Party Page to see where we link up each week!
photobucket

Wednesday, June 26, 2013

FOOD: Peanut Butter Sundae Topping


When we lived in Memphis, we had a family tradition of going to Baskin Robbins almost every week. Haley would always get the brightest, most colorful ice cream they had (which consisted of mysterious flavors in bright green, blue and purple) and Pat and I would share a Reese's Cup sundae. Our favorite part of that sundae was the warm, rich peanut butter sauce that they would layer in the sundae. We always got extra because we couldn't get enough of the stuff. If they sold it by itself, I'd gladly eat a bowl of peanut butter sauce.

Now that we live in Pittsburgh, sadly there isn't a Baskin Robins near us to satisfy our peanut butter sauce cravings, so I decided that I needed to make my own! This recipe isn't the exact same as the one from Baskin Robbins, but it's still pretty darn good. Now that it's summer, I will be keeping a big jar of this stuff on hand to drizzle on my ice cream cones (or just eat by the bowlful :)


Peanut Butter Sundae Topping:
(Adapted from this recipe.)

INGREDIENTS: 1/2 cup heavy whipping cream, 1/4 cup brown sugar, 1/4 cup Karo syrup, 2 tablespoons butter, 1/2 teaspoon vanilla, 3/4 cup creamy peanut butter.

INSTRUCTIONS: Combine all of the ingredients above in a saucepan except for the peanut butter. Cook on medium heat, stirring constantly until all ingredients are combined. Remove from heat and stir in peanut butter. Let cool completely and store in refrigerator.

Makes 1 1/2 cups.


Happy summer!

Check out our Link Party Page to see where we link up each week!
photobucket

Tuesday, June 25, 2013

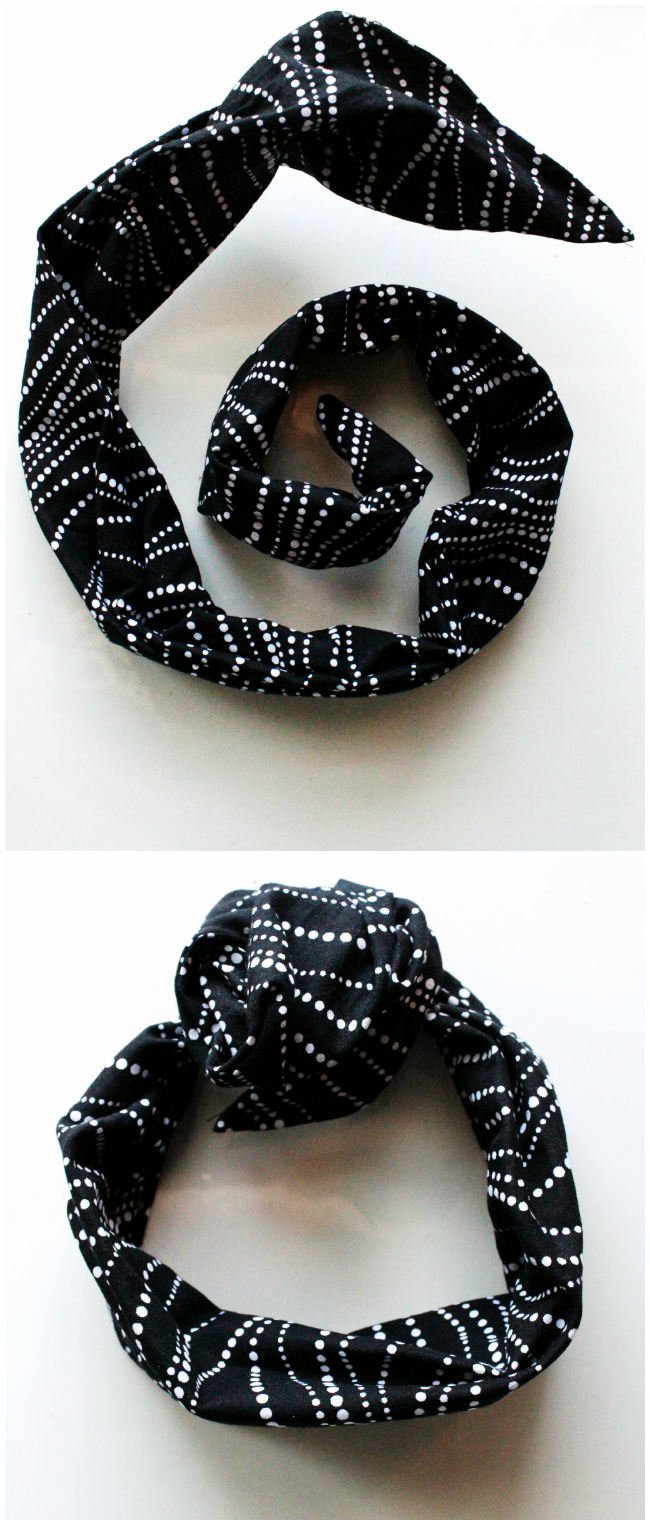
MAKE: American Apparel Inspired Wired Head Scarf

Yesterday I was out shopping and my friend Caitlin spotted these "Twist Scarves" at American Apparel.  She fell in love.  Super simple, super cute, super ridiculously priced.  $15 for some fabric with a piece of wire inside of it.  So, naturally, I said "Hey! I can make that!"

And I did!

Seriously, this only took about 10 minutes to make.  I think I'm going to make a ton of them because they're OH-SO-ADORABLE and make great gifts, too!

Supplies
Fabric - 36" x 8"
Plastic Coated Steel Wire - 18 Gage - 36" piece (plastic coated is a MUST, otherwise the wire will poke through your fabric)
Sewing machine (you could hand stitch, too.. it'll just take a long long time)

Your fabric should be 4 inches wide when folded in half.  I cut a slant on each end, 4" long, 4" tall and gave it an arrow shape.

Sew inside-out, leaving one end up.  Turn inside-out to get the pattern on the outside and slide your wire inside (36").  Sew up the end with the machine.


AND VOILA!  See how ridiculously easy that was?  


I will most likely have one of these scarves to go with every single outfit now.  Enjoy and have a wonderful wonderful week!  We <3 you!


Check out our Link Party Page to see where we link up each week!
photobucket

Monday, June 24, 2013

Whipperberry Creative Team - ESM Post #1!


Today we are over at Whipperberry doing our first project as part of the WB Creative Team!  We are so super excited.  Come over and check it out, along with the rest of Heather's amazing blog world! 


Friday, June 21, 2013

We Are Loving Right Now - Volume 8 - Cycle Bound Edition

So, you all know that Jen and I both try to stay as active as possible.  We're constantly posting about running and things of that nature.  Now, since the warm weather has finally settled into Pittsburgh, we've been looking for ways to get the entire family active.  What better way than riding bikes?  Even the kids can participate.

I, however, absolutely love going by myself.  We are fortunate enough to have miles and miles of the Montour Trail that wind through the suburbs of North and South Pittsburgh.  I like to hit it after work, when the sun is finally cooling down, pop in my earbuds and just cruise for miles and miles.  There's nothing quite as peaceful as being on a trail in the middle of farm country and the only other people you see are doing the exact same thing as you... appreciating life.

I decided to share with you all some of my fave biking gear (and my dream bike!!).  This is all stuff that I've found to make the biking experience more enjoyable.


1 - Raleigh EVA 4.0 Women's Bike - 2013 - $499 - REI - pretty dreamy for a mountain bike, right??
2 - Oakley Women's Warm Up sunnies - $120 - Oakley - Have them. Love them. Can't live without them.
3 - GNC wellBEing be-HOT Exercise Enhancing Turbopack -  Burn more calories, have more energy. Win/Win!
4 - Life Proof iPhone Bike Bar Mount - REI - Keep your phone right in front of you
5 - Giro Tessa Fingerless Cycling Gloves - Dick's Sporting Goods - No more sweaty, slippery hands on the handle bars.
6 - Quirky Props - Birchbox - In case you need to pull your earbuds out, these suckers keep them from falling off your neck. So handy when you're on a bike!
7 - O2Cool Prism Water Bottle - Amazon - This might be my favorite bike accessory.  I've found when I have a water bottle in my holder, it tends to get covered with dirt and gravel when I'm riding.  I searched high and low to find a water bottle with a mouthpiece that is not exposed.  I finally found this sucker... and even better... it has a water mister included!

The only thing in this round-up that I do not own is the bike.. but I'm working on that!  (Birthday's coming up, y'all!)

Get out there and get active. 

If you want to follow my cycling adventures on The Montour Trail, follow me on Instagram.  I obsessively post photos of the awesome little things I see when I'm out and about.  @svenanzio

Thursday, June 20, 2013

Classic Chinos


Sewer or Sewist....do you have a preference? I tend to lean towards sewer myself, but I'm sure it doesn't sound as polished as "sewist" (plus, I'm sure there are plenty of people who don't envision thread and a sewing machine when they see the word "sewer." Whatever the case, I recently had the opportunity to pattern test the Classic Chinos pattern for Amy of Nap Time Crafters and Peek-a-Boo Pattern Shop, and it really challenged my skills as a sewer (or sewist :)

Before trying out this pattern, I had never attempted to install a real zipper fly, hammer on button, or welt pockets. After finishing these babies, I felt like a sewing rock star! And let me tell you, Amy made it really easy to understand with all of her pictures and explanations. I won't say I didn't do a couple things wrong at first (because isn't that tradition with all of my sewing projects anyway?) but after I finished the pants, I felt so accomplished!


For my daughter's pair, I went with a pretty blue chambray that I found in the remnant bin at my local Jo-Ann's (and I haven't been able to find any since, gah!) It has a beautiful feel to it and it was perfect for these pants, but for the love of all things holy, I can NOT get the wrinkles to come out! Can anyone please tell me how to get wrinkles out of chambray? I also have a chambray shirt that I adore but don't wear very often because I get what I call "accordion sleeves." After washing, the sleeves scrunch up accordion-style, and I can't get them to iron flat to save my life. If you have any helpful tips to solve my problem, I will give you a giant virtual hug.

All that said, I absolutely love how these pants came out, and I don't regret using chambray because it looks gorgeous on these pants (and will look even better once I figure out how to get those blasted wrinkles out.)


After making the first pair, I was feeling pretty invincible, so I decided to make a pair of shorts for Connor using the same pattern. I forced Connor to take photos right after nap, so he was less willing to cheese it up for me :)


Connor's pair was made from a wonderfully soft pair of my husband's discarded khakis. Like the first pair, they have a flat front with elastic in the back. While Connor typically wears 2T, I made the pants in a 3T so he can grow into them and use them next summer as well. I'm all about stretching the wardrobe :)


I love this pattern! So versatile and classic. And I'm proud to say I can now make functional zipper fly's and welt pockets thanks to Amy! I definitely see quite a few more pairs of these pants in our future. 

Check out our Link Party Page to see where we link up each week!
photobucket

Wednesday, June 19, 2013

High-Low Racerback Tunic {Guest Post on Me Sew Crazy}

I've been trying to sew more clothes for me lately, so the recent hot days were the perfect excuse to make a new shirt for myself! I got adventurous and drafted my own pattern to make a high-low racerback tunic.

LOVE.


"Love" wasn't my first reaction when I found this fabric, but when I transformed it into this beautiful flowy tunic, it's become one of my favorite finds to date!

Head over to Me Sew Crazy to hear more about this unlikely fabric choice, and to learn how to make your own high-low racerback tunic!

Monday, June 17, 2013

(Shan) WEARs: Purple & Black

I've been wanting to do more style posts lately, so I figured now was as good a time to start as any!  Doing posts like this really help challenge my creativity with my wardrobe.  I have a lot of clothes.  A LOT.  But, I tend to wear the same things over and over again.  I'm really trying to break that habit!  Once a week I try to wear something I haven't worn in more than 6 months.  

Today, it was these shoes.  I love these shoes!  Why don't I wear them more? I have no idea.

I love the intricacy of the back of this top.  It was what drew me to it.  It's so fun and different!


Detes:
Top:  ASTR via Nordstrom
Tank: Marshalls
Skirt: H&M
Scarf: American Apparel
Shoes: ShoeDazzle (a few years ago)
Bracelets: No idea!!

It's going to take some getting used to taking and posting photos of myself when it comes to outfits.  It makes me feel narcissistic and I don't like that very much.  I'm not doing this to show myself off, but to help inspire some fun and creativity in your own outfits!  It's not hard to mix things up with what you already have... this can be an adventure we have together!  xoxo

Related Posts Plugin for WordPress, Blogger...