Photobucket
Showing posts with label tips and tricks. Show all posts

Tuesday, May 5, 2015

Faux Button Placket (No Buttonholes Involved!)


With an ever-growing to-do list, I'm always looking for short cuts. Which leads me to a confession....

I hate buttonholes.

Phew, glad I got that off my chest! For the longest time, I refused to sew buttonholes. I think my fear stems mostly from the fact that I've been sewing for the last 5 1/2 years on a basic sewing machine, and my sewing machine hates buttonholes. What I mean is, my machine knows how to make buttonholes, it just flat out refuses to make them. And when it does, it usually takes me 2-3 times of unpicking stitches before I have semi-presentable results.

And who wants to spend an hour on buttonholes? Ain't nobody got time for that. That's how I came up with an idea to make a faux button placket!


Now, I'm not going to promise you that this method cuts your buttonhole making time in half or anything like that (and actually it may take a little bit longer), but if you're like me and have a machine that just doesn't like to make buttonholes, or if you're not ready to make the plunge into making buttonholes, this tutorial will give you a finished button placket that people will never guess is a fake. Plus, since we're using velcro, a faux placket makes it much easier for little ones to dress themselves.

Ready to add a faux placket to everything??

SUPPLIES: finished top, velcro, disappearing ink marker, buttons at least 1 inch in diameter or more, sewing machine, needle and thread.


First, you'll need a finished top that needs a button placket. This particular top above is a peplum top I made as part of The Sewing Rabbit's fall 2013 collection, minus the piping. (Come visit me on The Sewing Rabbit to learn how to make a peplum top next week!)


ONE: first, measure your shirt from neckline to the bottom and subtract an inch.
TWO: next, separate your velcro so that the "hook" part, or the scratchy part, is separate from the soft "loop" part of the velcro. Cut a length of the loop portion of the velcro only,  as long as the measurement you wrote down above.
THREE: pin your loop tape to your shirt, leaving a 1/2 inch margin on both the top and bottom.
FOUR: sew around all sides of your tape to attach it to your shirt.


FIVE: now you'll need to cut squares of the "hook" portion of the velcro to attach to the other side of your button placket. You'll want each square of hook tape to be slightly smaller that your button (so people won't be able to see your stitch lines), so trim if needed.
SIX: cut out as many squares of hook tape as you have buttons. See how my hook tape is slightly smaller than my button?
SEVEN: now use your disappearing ink marker to make marks where you want your buttons to go on the underside of your button placket.
EIGHT: pin each square of hook tape on the marks you just made and sew to secure.


Here is what the other side of your button placket will look like as soon as you've sewn your hook squares down! Now all that's left is to sew your buttons on right on top of your squares to hide your stitches.


And now you have a beautiful faux button placket with no buttonholes involved! I'll be no one will even notice it's a fake :)


Wednesday, September 24, 2014

Fix Tight Pants by Adding a Tuxedo Stripe

This post was previously featured on The Sewing Rabbit, and I'm bringing it home today. Enjoy!


My sister-in-law recently gave my daughter a pair of the cutest strawberry printed skinny pants from Gymboree. The only problem was that they were squeezing the circulation out of my daughter's already tiny buns. I was able to get them on her, but it wasn't without lots of tugging and pulling and uncomfortable pressure on her belly. I couldn't bear to see the pants go without being worn, so I decided to utilize the tuxedo stripe trend and let the pants out by adding a stripe of material to either side side of the pants. It worked like a charm!

Trendy and useful? Check and check.


It's relatively easy to take in a pair of pants that are too big, but usually much more difficult  to let out a pair of pants that are too tight without going to a tailor. This method  got me the results I wanted while also following a trend at the same time. I call that a win in my book!

Let's get refashioning!

SUPPLIES: 1 pair of tight pants in need of adjusting, coordinating material to use for the stripe (use bottom weight fabric like twill, denim, corduroy, etc.), seam ripper, heavy duty or denim needle, sewing machine and basic sewing supplies.


Here is the pair of pants I started with. I didn't get a picture of my daughter in them beforehand, but let me tell you, they were tiiiiiiight!


I chose to go with denim that I had in my stash because it matched perfectly with my pants. There are a lot of great color choices in bottom weight fabrics out there though. You could also go with a contrasting fabric, but I didn't want to go too crazy since the pants already had a busy pattern to them.

Deconstructing Your Pants:

ONE: using your handy dandy seam ripper, carefully rip the stitches on each side of your pants from below the waistband to the bottom of the pant leg.


TWO: now, if your pants have an adjustable waistband like mine did, make sure to unbutton the elastic and push it back into the waistband away from the side seam so you don't cut it accidentally in the next step.


THREE: now I know this part can be a little scary but you're now going to cut your waistband on each side, being sure to avoid cutting the elastic from your adjustable waistband if you have one. Just make a straight cut following your side seam.
FOUR: open your pants up and wonder what you just did to your poor pants. Just kidding, stick with me! :)

Adding The Tuxedo Stripe:

ONE: measure the full length of your pants from right below your waistband to the bottom and add 1 inch for seam allowance. You'll also need to include the length of your waistband (you'll see why in the next few steps), so measure from the top to the bottom of your waistband and multiply x2 (to include the length of both the front and back.) Mine was 1 1/2 inches from top to bottom x 2, so 3 inches total. Add that to your other total length measurement.
TWO: decide how much total width you want to add to your pants depending on how tight they are and divide by 2, then add 1/2 inch for seam allowance. I decided to add a total of 3 inches to the pants, so each stripe would need to be 1 1/2 inches wide plus 1/2 inch, so 2 inches each. Cut 2 from the lengths and widths you determined above, making sure the stretch of the fabric, if there is any, is going sideways.
THREE: next, unpick your waistband by about 1 1/2 inches.
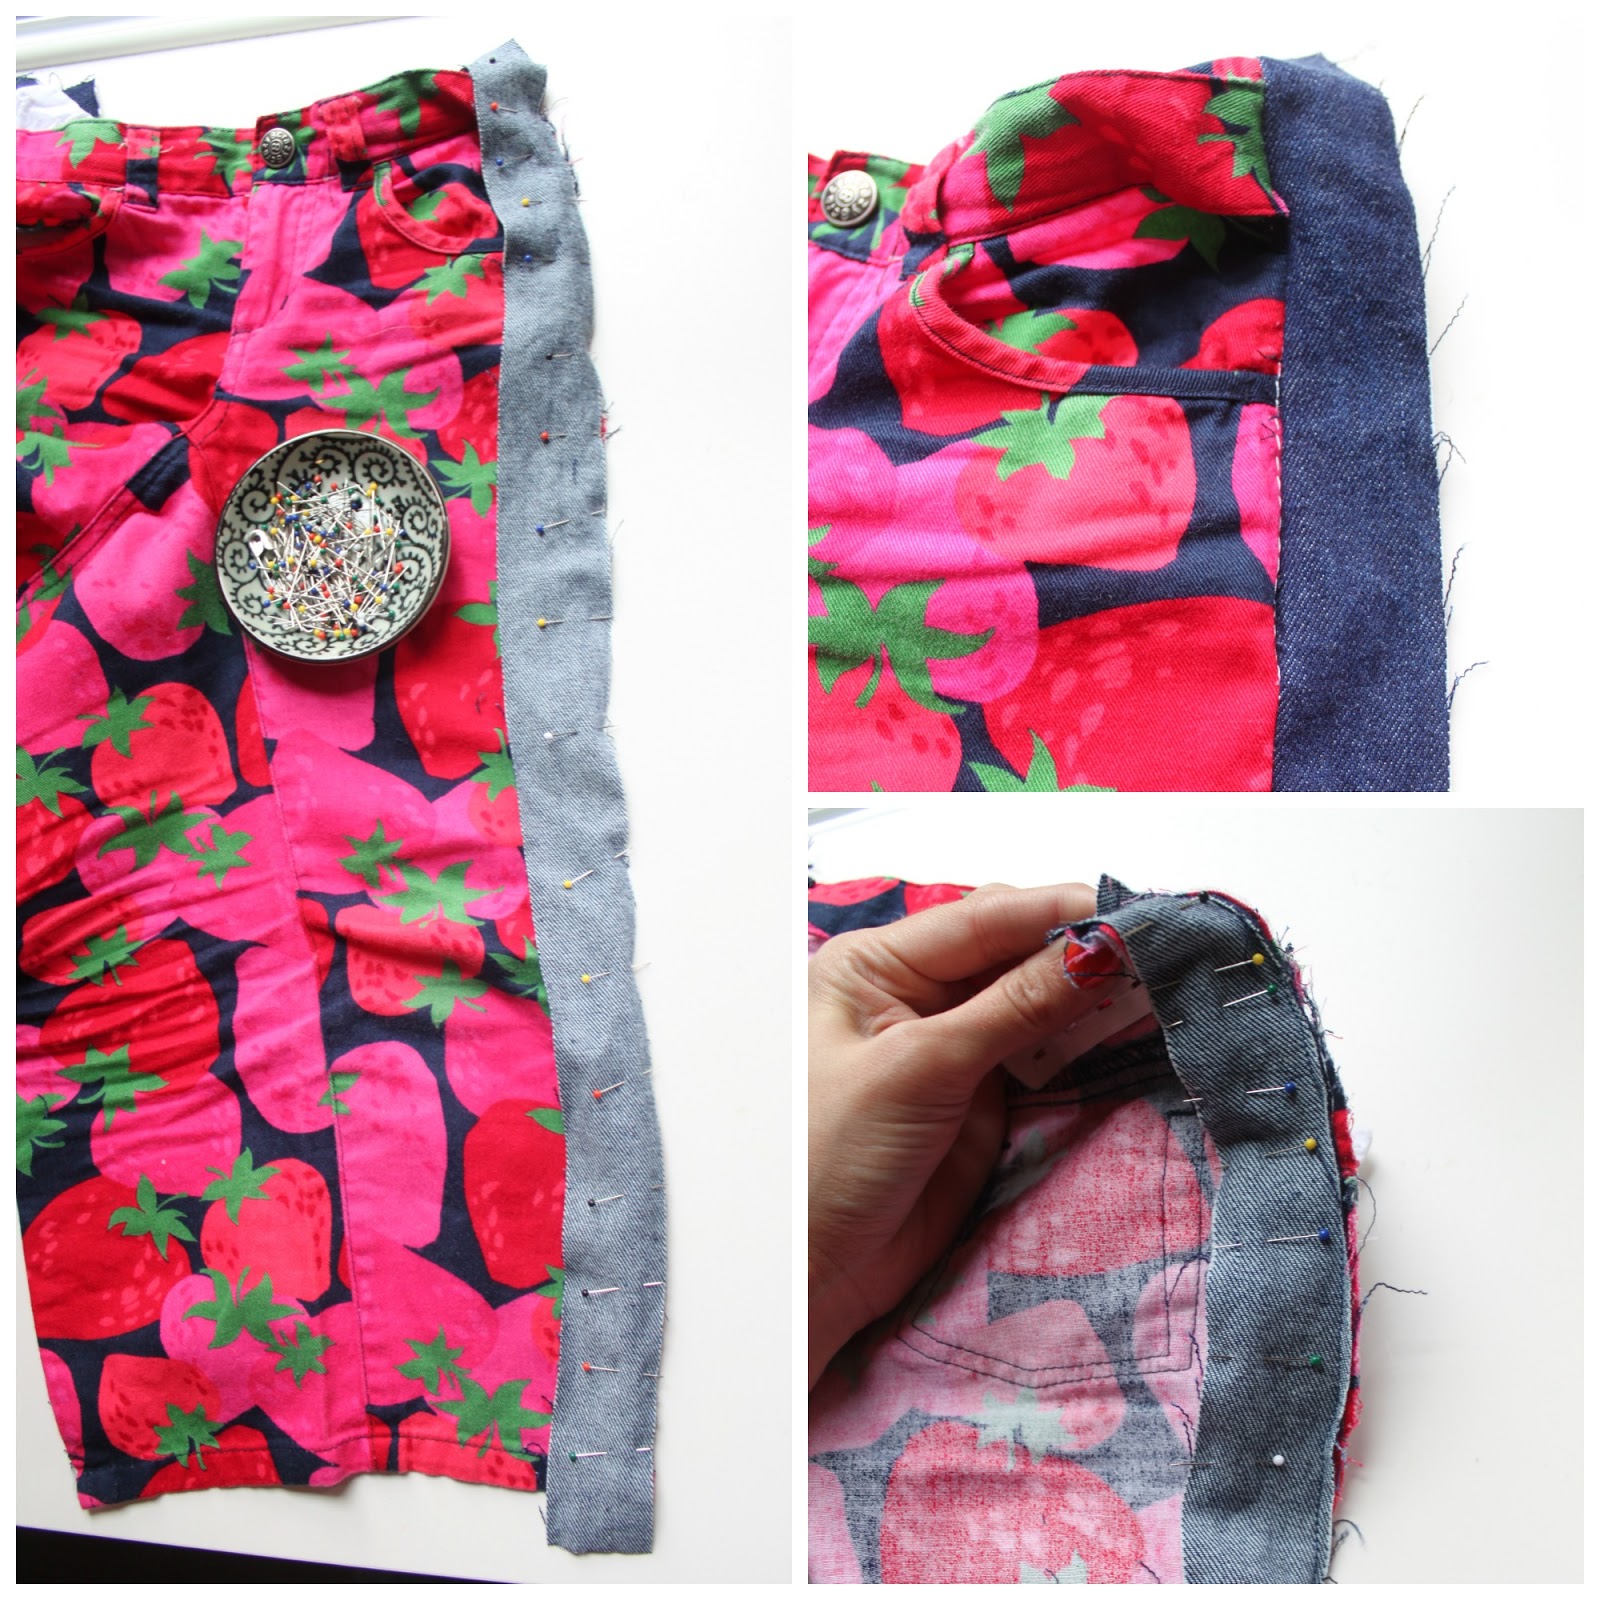
FOUR: open your waistband so it lays flat. Extend one of your tuxedo stripes 1/2 inch over the edge of the waistband and line the raw edge of one of your tuxedo stripes up with the raw edge of your pants, right sides (or pattern sides) together (see picture below.)


FIVE: pin your stripe along the raw edges and sew with your heavy duty needle.
SIX: unfold your tuxedo stripe and press.
SEVEN: Fold your pants so the raw edge of the remaining side of your tuxedo stripe matches up with the other side of your pant leg, right sides together, and pin all along the edge. Sew. Zig-zag or serge the long edges. Repeat steps 1-7 to attach the other tuxedo stripe.

Finishing:

ONE: fold your waistband down.
TWO: if you have an adjustable waistband, reinsert your adjustable elastic back into the hole where it was before.
THREE: turn the raw edge of your tuxedo stripe under, and stitch along the bottom of the waistband, following the original lines of the waistband.
FOUR: you should now have a nice, finished waistband!


FIVE: now to finish the cuff of the pants, just fold the raw edge a couple of times so the raw edge is contained (like you did with the waistband above.)
SIX: stitch along the bottom following the original hemline.


Now you have a pair of pants that won't cut off your circulation anymore with the added bonus of being trendy :) I'm a little jealous that my daughter has a pair of tuxedo striped pants and I don't. I'll have to change that soon!


While this method would certainly work for most pants, remember that you're adding width all over the pants, including the leg area, so the skinny jeans I added the stripe to are now roomier, straight leg pants. If you have pants that already have a wide leg, you may need to take the inseam in a bit after adding the stripe unless you don't mind the extra width. Make sense?

I hope this little trick helps to save some pants that were destined for the trash!

Thursday, November 14, 2013

Fix Tight Pants (The Trendy Way!)


You know that one pair of pants you have hidden in the back of your closet that you can't bring yourself to donate or throw away? Well today I'm over at The Sewing Rabbit sharing a totally fashionable way to fix those bad boys so you can rock them in style. I used this trick on my daughter's jeans, but you can easily apply it to adult pants as well.

See you there!

Monday, August 26, 2013

How To Add Snaps To A Romper


If you have a daughter, you probably also have several of these around:


Rompers are super adorable and very in style right now, but if you own a romper, you can attest to the fact that it's not exactly ideal to strip down to your birthday suit just to go to the bathroom. It's especially bad for little girls, like my daughter and niece, who aren't able to dress themselves quite yet. I mean, you'd think that there would be snaps on those things to help out the kids at least, right?
 
Not always the case.
 
My SIL asked me to add some snaps to a romper for my niece recently, and I thought that there may be a few of you out there that would find this little fix pretty helpful as well :)
 
SUPPLIES: romper, scraps of fabric for snaps (I cut some pieces from an old knit t-shirt), snap kit and snap setter (or sew-in snaps if you don't own a snap setter), sewing machine or needle and thread, seam ripper, tape measure, iron and ironing board.
 

ONE: first, use your seam ripper to carefully rip the stitches in the crotch area where the snaps will be sewn.
TWO: next, use your tape measure to determine how wide to cut your fabric for the snaps and add 1/2 inch. My pieces ended up being 3 inches x 3 inches.
THREE: cut out two pieces of fabric in the dimensions noted above.

FOUR: use your iron to iron all the sides 1/4 inch, then iron each piece in half (see picture above.)
FIVE: encase the raw edge of the crotch area in your fabric piece and pin all around. Sew to secure. Repeat for the other side.
SIX: finally, follow the instructions on your snap setter to attach your snaps.


Yay for snaps and for no more awkward bathroom moments!
 

Check out our Link Party Page to see where we link up each week!
photobucket

Monday, July 22, 2013

CRAFT: Easy Flip Flop Fix (Just Add Straps!)


My four-year-old daughter unfortunately inherited my balance...or lack thereof. We both have problems walking on flat surfaces, and during the summer Haley's knees are covered with band-aids most of the time because of trips and falls. Throw flip flops in the mix, and it's pretty much a disaster!

Haley was given a couple adorable pairs of princess flip flops from a friend for her birthday but after wearing them only once, she was tripping all over the place because they didn't stay on her already unsteady feet. She loves the flip flops and was pretty heartbroken because she couldn't wear them, but then it hit me: straps! All she needed was a couple straps to help her little feet stay in the shoes, so I grabbed some pink elastic and came up with this quick fix.


SUPPLIES: flip flops, elastic, lighter, needle and thread. That's it!


First, cut out 2 pieces of elastic. I can't give you exact measurements because each child's feet are different, but for my daughter's size 11 feet (I know, she has giant feet for being only 4!) I cut about 8 1/2 inches of elastic each. Next, use a lighter to carefully singe each edge to avoid fraying.


Fold your elastic around your shoe strap. Double up your thread, then thread your needle and sew a row or two of stitches close to the edge of your elastic. Repeat for the other side.


Done! Couldn't be easier, and now my daughter can wear her flip flops that would have never gotten worn otherwise. Yay for quick fixes and saved flip flops!


**After I finished this project and post, what do you know, Andrea from The Train to Crazy posted a link on Facebook to the exact same project by Delia on Delia Creates from 2010! I guess we both have clumsy children in need of souped up flip flops :)**

Check out our Link Party Page to see where we link up each week!
photobucket

Thursday, July 18, 2013

Tips: Keep Bugs Out of Your Sandbox


This summer is the first time we've gotten our kids a sandbox and it was an instant hit. The first day we set it up, we couldn't drag them away from it. After we were done playing, we covered the sandbox with a lid and went to bed. The next day when we went outside, the sandbox was full of bugs! Let me tell you, it's no fun to dig a bunch of itty bitty bugs out of a sandbox with a tiny shovel. I'm sure many of you have the same problem if you have a sandbox, and no one wants to spend every day digging bugs out of the sand. Luckily, I have a fun little trick that works wonders for bug-filled sandboxes, AND you probably already have it in your pantry....


...cinnamon!

You may be skeptical, but trust me it works! On top of having numerous health benefits like reducing LDL cholesterol levels, cinnamon is also a natural bug repellent. Just sprinkle liberally (and I mean very liberally) into the sand and mix and no more bugs!


 On top of getting rid of all the pests, it leaves the sandbox (and your little ones' toes) smelling amazing. I won't promise that it'll keep every bug out of your sandbox, but we've seen a huge improvement since we started sprinkling in cinnamon.


You can buy large bottles of cinnamon at Sam's Club pretty inexpensively. Better yet, check your local Dollar Store. I hope this little tip helps you as much as it did for me! Here are a few other unexpected uses for cinnamon.


Check out our Link Party Page to see where we link up each week!
photobucket
Related Posts Plugin for WordPress, Blogger...