Photobucket
Showing posts with label dress up. Show all posts

Wednesday, October 15, 2014

Kid's Hippie Costume Tutorial


This month's Michael's Makers challenge was a fun one - Halloween costumes! To be honest, before we received this month's challenge, I had already made Connor's Minion Costume and I was happily calling it done on Halloween. When I got the challenge email, I started sweating a little. My go-to costumes usually involve sewing, and Michael's doesn't carry a wide array of fabric. Plus, all Haley never wants to be for Halloween is a princess. I was stumped.

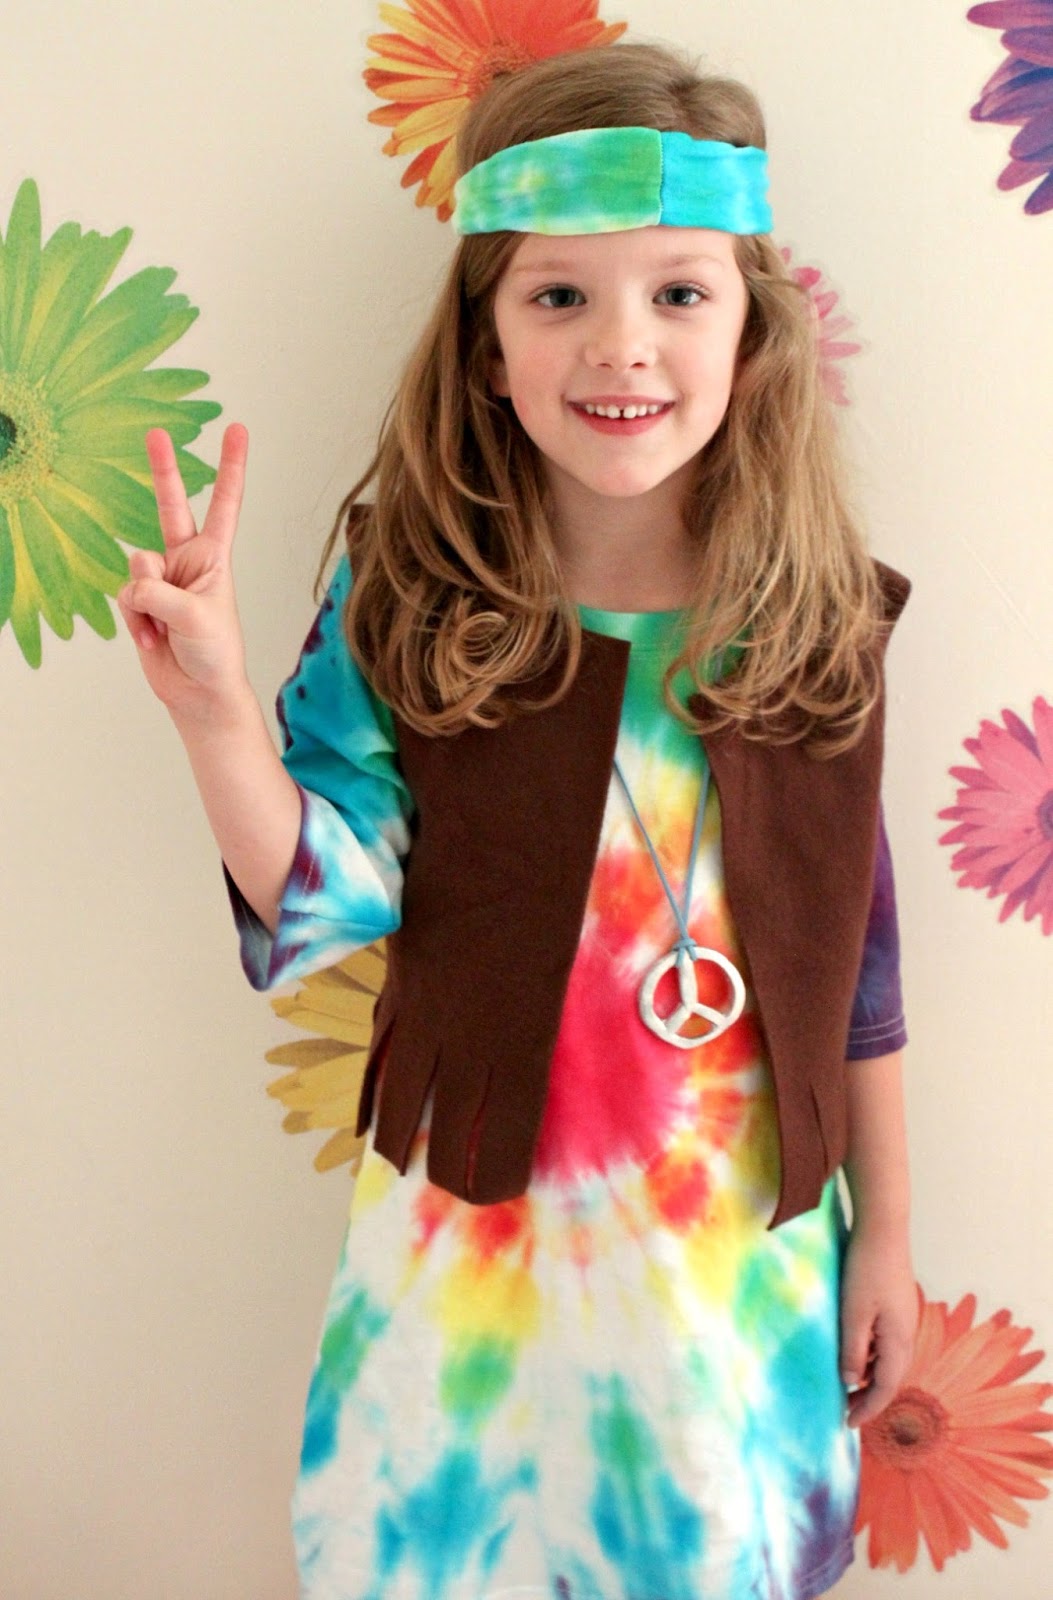
The husband, kiddos and I decided to take a stroll through Michaels for inspiration, then my husband spotted a tie-dye kit. "How about making a hippie costume?" he asked. Brilliant! I grabbed an extra large youth shirt and some other supplies, and turned my daughter into a little flower child.


It's no princess costume, but it's colorful AND I managed to turn the shirt into a dress, so we were both happy. And that's a win in my book.


Wanna make one for the little flower child in your life?

SUPPLIES: For the tie dye dress- 1 white XL youth shirt (for roughly a size 6 dress, larger for a bigger child), Jacquard Tie Dye Kit, big plastic tub, sewing machine, scissors For the vest- a shirt that fits your child well, 1/2 yard fleece or felt For the necklace- suede lacing, modeling clay

Tie Dyeing Your Shirt:
It's important to dye your shirt first because it needs time to dry overnight. Also, you can make any tie dye design you like, but I'll explain how I made this particular design below.

ONE: first, pinch your shirt in the middle as shown.
TWO: wrap a rubber band (included in the tie dye kit) several inches down from where you pinched.
THREE: continue wrapping your shirt in rubber bands until you reach the bottom, then soak your shirt in soda ash as directed in your tie dye kit.


FOUR: use your tub to catch the excess dye as you paint your shirt, and begin to add your colors. Be careful what colors you place side by side, otherwise you'll end up with some unwanted colors blending together to make brown or black.
FIVE: you can combine colors to create other colors that don't come in the kit, i.e. red and yellow to make orange, blue and yellow for green, etc.
SIX: continue carefully adding your dye to your shirt, being sure to squirt paint into the folded crevices, and gently squeeze out excess dye as you go.
SEVEN: when you've finished dyeing your shirt, follow the instructions on your tie dye kit to wrap your shirt and let dry overnight.

Creating Your Vest:


ONE: take a shirt that fits your child well, and tuck the sleeves in. Fold it in half.
TWO: trace around your shirt, adding 1/2 inch at the shoulders and sides for seam allowance. Mark a dotted line several inches lower than your back neckline to indicate your front neckline. Cut out your pattern.


THREE: fold your fabric in half and place your pattern on the fold. Trace and cut out one back bodice. Fold your fabric again and place your pattern NOT on the fold and cut to make two pieces for your front bodice.
FOUR: you should now have three pieces: a back bodice and two pieces for your front bodice.
FIVE: place your two front bodice pieces on your back bodice with right sides together, and sew together at the shoulders and sides only.


SIX: use a rotary cutter and mat or scissors to cut vertical lines in your finished bodice for the fringe.

Turning Your Shirt Into a Dress:


ONE: after your shirt has soaked as directed, remove the rubber bands and unfold shirt. Wash as directed before moving on.

TWO: turn your tie dye shirt inside out. Take a shirt or dress that fits your child well and place it on top of your tie dye shirt. Sew along lines indicated in the picture above to make the shirt a more fitted A-line dress. No hemming required! Save the scraps that you trimmed off the side of your tie dye shirt for the headband.

Making Your Headband:

ONE: you should have 2 odd-shaped scraps left over from trimming your dress above.
TWO: cut off the top of each piece (the part that includes part of the sleeve) and discard.
THREE: place the widest part of each trimmed piece right sides together and sew or serge raw edge.
FOUR: fold your headband long ways, and sew or serge along the long end.


Turn your tube inside out, and you now have a coordinating headband!


If you'd like to also make a peace necklace, you can cut a rough peace sign out of modeling clay then bake and paint. Finish with leather cording. Your hippie outfit is now complete!


Truth be told, my daughter has no idea what a hippie is. She just really loves her new, colorful dress (and bonus: she can wear it whenever she wants!) I love costumes that can be worn beyond one night, don't you? And the fringed vest and peace sign really add a lot of fun detail to the whole get up.


It's totally far out, man


We hope you have fun making your own hippie costumes too! If you're still stumped on what to make, you can also check out Michael's Halloween Market for some great inspiration and DIY's.


Wednesday, October 9, 2013

Fall Felt Series: Hooded Dragon Cape


My almost 3-year-old son has come out of his shell lately. Usually shy and withdrawn around most people, Connor has all the sudden become the little life of the party in an unusual way: he loves to pretend to be different animals. Most often, a dragon. I'm not quite sure where he got the idea, but it's pretty darn cute seeing him flap his little arms while pretending to fly around the house and breathe fire like a dragon!

When trying to decide what costume Connor should wear this Halloween, it took me about 2 seconds to decide that Connor needed a dragon costume. There's one obstacle though: Connor doesn't like wearing costumes. At all. Maybe it's the feeling of wearing multiple layers of clothing, but whatever the case, I knew I had to get creative.

I thought about my options for awhile, and finally landed on the idea of making Connor a hooded dragon cape out of felt.

He loves it! 


This felt dragon cape is lightweight, and since I made a cape rather than a full costume it doesn't bother him at all. Plus, it has a hood in case the weather is chilly, and velcro tabs at the neck keep the dragon wings on on in case he wants to put the hood down. But the best part? The cape has slits in the lining so my little dragon can flap his wings. Because what fun is it being a dragon if you can't fly around breathing fire??

I'm sure I'm not the only one with a toddler who is picky about his costumes! If you'd like to make a felt hooded dragon cape, here's what you need:

SUPPLIES: 1 yard each of 2 different colors of green felt (I used Rainbow Recycled Classic Felt in Apple Green and Kelly Green from Michael Levine, Inc.), scraps of felt to use for spikes and tail (I used Rainbow Recycled Classic Felt in Orange from Michael Levine, Inc.), shirt with a hood to use as a template, freezer paper or wrapping paper to make the pattern, chalk or disappearing ink marker, rotary cutter and mat, small piece of velcro, sewing machine and basic sewing supplies.

Making Your Pattern:

ONE: fold your template shirt in half and lay it on the edge of your paper.
TWO: trace around the neck, top of the arm, and bottom of the shirt only, adding 1/2 inch for seam allowance.
THREE: where the sleeve ends, draw a dragon hand. Make sure the hand is a little bigger than your child's hand since we will be making a slit in the costume for him/her to fit their hand into later.
FOUR: draw the rest of the dragon wing shape, ending just below the bottom of the shirt line that you drew. I also altered the sleeve to make it more pointed and "dragon-like."


FIVE: cut out your pattern piece.


SIX: fold one of your sheets of green felt in half and lay your pattern on the fold. Trace around your pattern and cut out your dragon wings. Repeat with your other shade of green felt. You should have 2 felt dragon wings.


SEVEN: lay your template shirt on a piece of pattern and trace around the hood, adding 1/2 inch for seam allowance.
EIGHT: add a 4 inch long by 2 inch wide rectangle tab to the front of the hood (see picture above.) This will be used to secure the hood around your child's neck with velcro later.
NINE: cut out 2 hood pieces from each color of green felt (total of 4.)

Design and Reverse Applique:

We are going to utilize reverse applique to make the dragon wing design. If you've never done reverse applique before, you'll love it! It's a great way to easily sew intricate patterns by layering fabric and cutting away the top layer of fabric to reveal the one underneath.

ONE: place your 2 dragon wings together and match up the raw edges. Pin all around and sew edges closed.
TWO: Use your chalk or disappearing ink marker to draw your dragon wing design. If you have no idea what design to draw, a quick Google of "dragon wings" should give you some good ideas!
THREE: sew on top of the design that you drew.
FOUR: if you have small scissors, that would be ideal for this next step. If not, no worries, I used regular scissors. Begin to cut away the top layer only inside of the design you just stitched. try to cut as close to the stitching as possible without cutting through the stitches.


After you've cut away the top layer, it will reveal your felt below the design making it pop!

Adding the Spikes and Hood:

ONE: cut several pairs of triangles from your scrap felt to add to the tail and hood (I cut a total of 8 triangles.) Sandwich the end of your dragon tail between two triangles and sew around the edges to attach.
TWO: for the remaining triangles, sew 2 of the 3 sides.
THREE: sandwich the unsewn edges of the triangles between the two hood pieces that will be your main outside hood pieces (for me, this was my lighter green felt.)
FOUR: pin and sew the curved portion of your hood only from top edge to the bottom edge (see picture above.)
FIVE: turn your hood inside out revealing your triangles. For your other 2 hood pieces, simply pin and sew the curved portion from top to bottom as you did above.


SIX: insert your inner hood inside of you main hood and match up the raw edges. Pin around the outer edges and tabs as shown above and sew to attach the 2 hoods, leaving the bottom unsewn.
SEVEN: cut two pieces of velcro and sew the hook portion (the scratchy part) to the inside tab on your hood. Sew the loop portion (the soft part) to the outside of your other tab.
EIGHT: line up the raw edge of your outer hood with the neckline of your wings, right sides together, and pin and sew (notice how you're only sewing the outer hood for now.)
NINE: flip your hood down so that your inner hood hides the raw edges of the neckline you just sewed. Use your fingers to fold under the raw edges of your inner hood, and sew your inner hood along the neckline.

Make Slits for Hands:

For the final step, you'll want to make slits in the inner layer of felt for your child to slip his/her hand into so they're able to flap the wings! Simply mark a line in the inner layer of felt and use scissors to cut a line in the inner layer only.

Now admire your ferocious dragon cape!


Now, of course, is the true test. Trying it on your little dragon to see if he approves.


Not only does it look cool, but your little dragon can also put his hands into the hands of the cape and flap his wings! That was definitely my little guy's favorite part. When he wasn't stuffing his face with the Skittles that I was using to bribe him for pictures that is ;)


And if your little dragon doesn't feel like wearing the hood, no problem. The velcro tab at the neck will make sure his wings don't fall off while he's trick-or-treating or doing other dragon-y things.


The Rainbow recycled felt from Michael Levine, Inc. was perfect for this project! It's soft, lightweight, and comes in so many pretty colors. You also get a ton of felt with your order - 72" - so I have plenty left over for more projects (and maybe another hooded dragon cape for sister!)

See you back here tomorrow for another felt project during our Fall Felt Series!

Check out our Link Party Page to see where we link up each week!
photobucket

Tuesday, January 8, 2013

CRAFT: Doll Diapers (Absorbent)


If you saw my previous post about the basic doll diapers and thought, "That's a nice idea, but I have one of those dolls that actually eats and wets herself, which is basically like having another kid. Yay." Worry no more my friend, we have one of those too. Meet Baby Alive, more affectionately knows as "Chloe."


Chloe not only talks and has an amazing head full of curls that are becoming very un-curly due to repetitive gnawing by my son, but Chloe ALSO comes with the extra added joy of being able to go #1 AND #2. Felt diapers can't do much about that.

Of course with all of those bodily fluids, Chloe's creators were nice enough to include a pack of tiny diapers for her little bum and the option to buy expensive refills when those run out. While I would just love to spend $10 on a pack of tiny diapers, I decided to make my own absorbent diapers using the same general idea as my basic doll diaper but larger to fit a bigger doll, and of course with added absorption.

SUPPLIES: my free downloadable absorbent doll diaper pattern (this pattern fits larger 18-inch dolls like this Baby Alive doll), flannel, terry cloth (washcloths are perfect if you don't have any terry cloth), disappearing ink marker, sewing machine and basic supplies

    ONE: first, fold your flannel with the right sides together and place your printed pattern on the fold. Trace around it and cut out. Repeat this for a total of 3 pattern pieces, 2 of flannel and 1 from your terry cloth or washcloth. I used an old washcloth and it was the perfect size.

     
    TWO: stack your layers of fabric as follows: flannel right side up, flannel right side down, terrycloth  (see picture above for reference.) Pin all the way around and sew using a 1/2 inch seam allowance - leave several inches unsewn for turning.


    THREE: clip your corners and turn right side out using a chopstick or other object to push out your corners. Tuck the raw edge of your flannel inside and use a whipstitch or a blind stitch to sew your opening closed.


    FOUR: finally, pin and sew your velcro on. You'll want the loop portion (the scratchy one) of your velcro to be on the outside of your diaper and the hook portion (the fuzzy one) to be on the inside (see picture above for placement.) 

    Now Baby's little bum will stay nice and dry while you're busy feeding her water and expensive fake baby food.


    Check out our link party page to see where we link up each week!
    photobucket

    Monday, January 7, 2013

    CRAFT: Doll Diapers (Basic)


    Whew, it's 2013! Is anyone else as exhausted as I am? It's a new, fresh year, but I'm finding myself dragging my feet still and trying to recover from the last one. With the passing of Christmas each year, I always find myself feeling bittersweet about it all. I'm worn out from the hustle and bustle of the holidays, but I also look forward to having my routine back, no matter hard it might be to get back into that routine. Shannon and I enjoyed our little blog vacation (thanks for hanging with us as we took a little break to recharge and spend time with family) and now we're ready to hit the ground running. 

    So, let's talk about butts, shall we?

    My daughter has quite a few stuffed animals and dolls laying around, and she really loves to diaper them. Side note: do you know how hard it is to diaper a stuffed monkey? That tail just does NOT fit well in a tiny doll diaper. Since Christmas just ended, I'm guessing many of your kids got quite a few dolls and stuffed animals that might be in need of some less expensive diapers, so I whipped out some felt and velcro and came up with a few simple no-sew diapers.

    SUPPLIES: my free basic diaper pattern found here (this diaper pattern fits medium-size dolls such as Cabbage Patch dolls),  felt squares, velcro, hot glue gun and glue, scissors.

      ONE: first fold your felt square in half and place your printed pattern on top. Trace around the pattern with invisible marker and cut out.
      TWO: cut your velcro into small squares and hot glue to your diaper as shown in #3 (make sure your "hook" portion of velcro is on the inside of your diaper and the "loop" pieces should be on the front.)
      THREE: now velcro the two pieces together and you have a finished felt diaper! Easy right? I made a whole stack of them in about 30 minutes.

       
      The pattern is sized for medium stuffed animals and dolls, but I'm sure you could adjust the size easily. I used felt so that I didn't have to bother with sewing exposed edges or anything like that, but cute patterned fabric diapers would be fun too!


      Haley loves changing her stuffed monkey's diapers now, and now all of the sudden other stuffed animals and dolls have decided they need diapers as well. Good thing I made a stack!


      P.S., we're over at Prudent Baby today sharing the tutorial for the knight's tunic I made for Connor. I'd love it if you came and said hi!


      Check out our link party page to see where we link up each week!
      photobucket
      Related Posts Plugin for WordPress, Blogger...